Getting Started with Cayenne IoT - #3: Soil Moisture Monitoring
This is the third tutorial of this series on Cayenne, the first ever drag and drop Internet of Things (IoT) platform. It teaches you how to quickly develop IoT applications using Arduino Yún.
In this tutorial you are going to develop a Soil Moisture Monitoring system using Arduino Yún and Cayenne.
Learning Objectives
At the end of this tutorial you will be able to:
- Read and display data from moisture sensor on dashboard in Cayenne
- Trigger notifications when moisture sensor reading crosses a threshold
Hardware
Note: If the model of Arduino that you are using comes with built-in WiFi capabilities then you do not need a separate WiFi Shield.
- Arduino Yún
- Moisture Sensor
- Breadboard
- Jumper Cables

Software
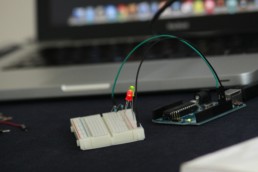
Circuit
Step 1: Make sure your Arduino is not connected to a power source.
Step 2: Using jumper cables connect power (VNC) and ground (GND) ports on Arduino to power (+) and ground (-) ports on breadboard.
Tip: It is a good practice to use red jumper cable for power (+ / VNC) and black jumper cable for ground (- / GND).
Step 3: Now that your breadboard has a power source, using jumper cables connect power (+) and ground (-) ports of your breadboard to power and ground ports of the moisture sensor.
Step 4: To read soil moisture level, you will need to connect a jumper cable from signal port of the sensor to A0 (Analog) port of your Arduino.
Your circuit is now complete and it should look similar to the figure below.

Cayenne Setup
Step 1: Login to Cayenne.
Step 2: From Dashboard click on Add new... link.

Step 3: Expand Sensors, then select Generic and Analog Input as shown in the figure below.
Note: Cayenne is still in beta version, so not all sensors are available. You can still add your sensor by selecting Generic option.

Step 4: As shown in figure above enter settings of your sensor.
Step 5: Click on Sketch button and copy the code.

Step 6: Start your Arduino IDE, paste the code in a new file and compile.
Note: During compilation the default code for Arduino Yún was throwing an error, so code was slightly modified to #include <YunClient.h>.
Step 7: Click on Step 2: Add Sensor button.

Step 8: Your soil moisture sensor will show up on the dashboard. Upload code to your Arduino device and then switch back to dashboard, within a few seconds dashboard will start showing your sensor readings. These readings automatically get updated, you do not have to write any special code.

Step 9: Cayenne provides ability to trigger notifications depending on device status or sensor readings. Click the gear icon on top-right of your sensor and select Trigger.

Step 10: Trigger settings screen will be displayed.

Step 11: Drag and drop your device in if section and select the soil moisture sensor. Also, select a value and condition for trigger e.g. in this case we have set the condition to be if sensor value is above 845 then trigger.
Note: The reason we selected above is because soil moisture sensor returns readings between 0 and 1023, high value means low moisture.

Step 12: In the then section select Send Email and Add a custom recipient.

Step 13: Click on Save Trigger.

Step 14: You can always enable or disable your trigger by using the button on bottom right.

Step 15: To test the trigger, put your moisture sensor in wet soil, the value will go down. Next take the moisture sensor out of the soil and the value will start going back up.

Step 16: The moment moisture value crosses the threshold (in this case 845) an email will be sent to the recipient that you added in trigger settings.

Getting Started with Cayenne IoT - #2: Temperature Monitoring
This is the second tutorial of this series on Cayenne, the first ever drag and drop Internet of Things (IoT) platform. It teaches you how to quickly develop IoT applications using Arduino Yún.
In this tutorial, you are going to develop a simple Temperature Monitoring System using Arduino Yún and Cayenne.
Learning Objectives
At the end of this tutorial you will be able to:
- Read and display data from temperature sensor on dashboard in Cayenne
Hardware
Note: If the model of Arduino that you are using comes with built-in WiFi capabilities then you do not need a separate WiFi Shield.
- Arduino Yún
- Temperature Sensor (TMP36)
- Breadboard
- Jumper Cables

Software
Circuit
Step 1: Make sure your Arduino is not connected to a power source.
Step 2: Using jumper cables connect power (VNC) and ground (GND) ports on Arduino to power (+) and ground (-) ports on a breadboard.
Tip: It is a good practice to use red jumper cable for power (+ / VNC) and black jumper cable for ground (- / GND).
Step 3: Now that your breadboard has a power source, using jumper cables connect power (+) and ground (-) ports of your breadboard to power and ground ports of the TMP36 sensor.
Step 4: To read temperature values, you will need to connect a jumper cable from the signal port (usually the middle port) of the TMP36 sensor to A0 (Analog) port of your Arduino.
Your circuit is now complete and it should look similar to the figure below.

Cayenne Setup
Step 1: Login to Cayenne.
Step 2: From Dashboard click on Add new... link.

Step 3: Expand Sensors, then select Temperature and TMP36 as shown in the figure below.

Step 4: As shown in the figure above, enter settings of your sensor.
Note: Selection in Connectivity drop-down depends on the type of sensor you are using. You have three options, in this case, Digital, Analog, and Virtual. Virtual reads analog data and according to the selected sensor converts the value into the correct format. For example, TMP36 will return data in voltage, so you will need to write a formula to calculate correct value. Choosing Virtual simply does that for you.
Step 5: Click on Sketch button and copy the code.

Step 6: Start your Arduino IDE, paste the code in a new file and compile. Make sure the virtual port in code is V0 since your temperature sensor is connected to A0.
Note: During compilation, the default code for Arduino Yún was throwing an error, so the code was slightly modified to #include <YunClient.h>.
Step 7: Click on Step 2: Add Sensor button.

Step 8: Your temperature sensor will show up on the dashboard.

Step 9: Upload the code to your Arduino device and then switch back to the dashboard, within a few seconds dashboard will start showing your sensor readings. These readings automatically get updated, you do not have to write any special code.

Step 10: Cayenne provides you with a few different options to view sensor data on the dashboard. Click the gear icon on top-right of your sensor and select Settings.

Step 11: From Settings screen you have the option to change the widget.

Step 12: Choose Line Chart and Save the Settings. The dashboard will update to show sensor readings in a line chart. There are a few other widgets available as well, and we will try those in upcoming tutorials.

Next Steps
In the next tutorial, we are going to develop a Soil Moisture Monitoring System using Arduino and Cayenne.
Getting Started with Cayenne IoT - #1: Arduino Setup
This article is the first in a series on Cayenne, the first ever drag and drop Internet of Things (IoT) platform. It teaches you how to quickly develop IoT applications using Arduino Yún.
In this tutorial, you are going to connect your Arduino device to Cayenne.
Learning Objectives
At the end of this tutorial you will be able to:
- Setup your Arduino device for Cayenne
Hardware
Note: If the model of Arduino that you are using comes with built-in WiFi capabilities then you do not need a separate WiFi Shield.
- Arduino Yún
Software
Cayenne Setup
Step 1: Register for a free account with Cayenne.
Step 2: Login to Cayenne. As a first time visitor, you will be prompted to choose a device to start your project. Currently, you can choose between a Raspberry Pi and an Arduino. For this tutorial, choose Arduino.

Step 3: On the next screen you will be presented with simple to follow instructions, follow all the instructions step-by-step. Once completed, click Next.

Step 4: On the final step, select your Arduino board from the list. In this tutorial, we are using Arduino Yún. As soon as you select a board, AUTH TOKEN FOR THIS DEVICE field will be populated with a unique authentication token. You will need this later on in the code.
Note: Based on the board that you select, you can also specify the internet connectivity mode that you will be using. For example, Arduino Yún comes with a built-in WiFi so no additional Ethernet shield or Wireless shield is required. On the other hand, if you are using an Arduino Uno, in that case, you will need to attach an internet connectivity shield. Specifying the shield here will generate the corresponding code.

Step 5: Click on Sketch button corresponding to your board and shield, and copy the code.

Step 6: Start your Arduino IDE, paste the code in a new file and compile.
Note: During compilation, the default code for Arduino Yún was throwing an error, so the code was slightly modified to #include <YunClient.h>.

Step 7: Upload code to your Arduino device and open the serial monitor.
Note: Make sure you select 9600 baud on your serial monitor, it should be same as the Serial.begin(9600) in your code.

Step 8: The moment you see output similar to shown above in your serial monitor, switch back to the Cayenne dashboard. Your device should have been successfully added and show up in the dashboard.

Next Steps
In the next tutorial, we are going to develop a simple Temperature Monitoring System using Arduino and Cayenne.