
Key Components Of A Digital Business Platform
Note: I am not associated with any digital business platform vendor. All information shared in this article is based on my experience and research.
Overview
Customer experience, operational process, and business model are the three key areas of digital transformation 1, 2. Regardless of which areas an organization focuses on, it needs a technology platform that will support its digital transformation goals. The term being used to define such platforms is Digital Business Platform (DBP) 3, 4.
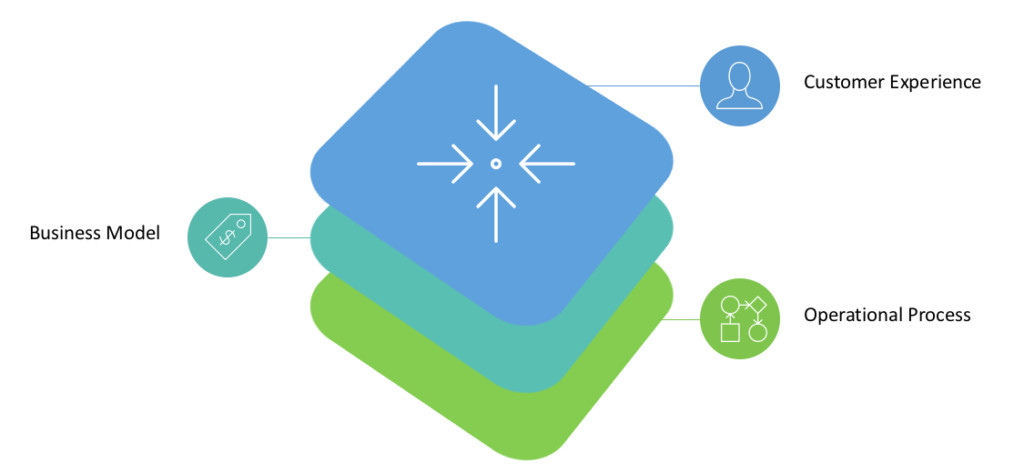
Figure 1: Key Areas of Digital Transformation
According to Jim Sinur, DBP is a convergence of best of breed approaches 5. The list below shows key components that constitute a DBP 6.
- Process Management
- Decision Management
- Integrations
- Data & Analytics
- Internet of Things
- Artificial Intelligence
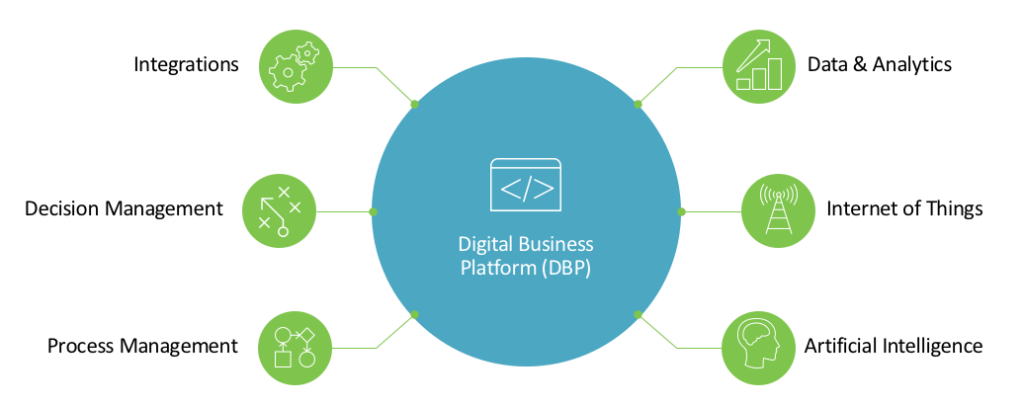
Figure 2: Key Components of a Digital Business Platform
All these components might not be available as part of a single unified platform. A single unified platform, of course, is preferred, but if your organization is heavily invested in some of these components already then you can always add-on to create a logical DBP of your own.
DBP vendors have taken different approaches as well to create their offerings. SoftwareAG, for example, had an integration platform, and over time acquired other products for their DBP offering 7. While Appian had a business process management software, they built additional features from scratch for their low-code application development platform 8, 9.
Now let’s take a deeper dive into each of these components.
Process Management
If you can't describe what you are doing as a process, you don't know what you are doing. - W. Edwards Deming
Processes are everywhere, they are what make organizations unique, they can make or break an organization. A process management component allows organizations to orchestrate the flow of work between people and systems. It provides tools for automation, execution, monitoring and optimization of processes.
All three key areas of digital transformation i.e. customer experience, operational process, and business model heavily rely on process management. A great looking website, mobile app or a digital product is required, they will (likely) result in great customer conversion rates, but in all cases, they will trigger or interact with some internal process. An organization will be able to acquire new customers of course, but customer retention will heavily depend on the quality of its internal processes 10.
Take for example the most common and relatively simple process of expense claims. It involves at least three sets of people and multiple systems. It can be done on paper or via email, but then you have no insights into the process. By automating this process, you can bring all the data into a single place, reduce data errors, provide visibility, and reduce cycle time.
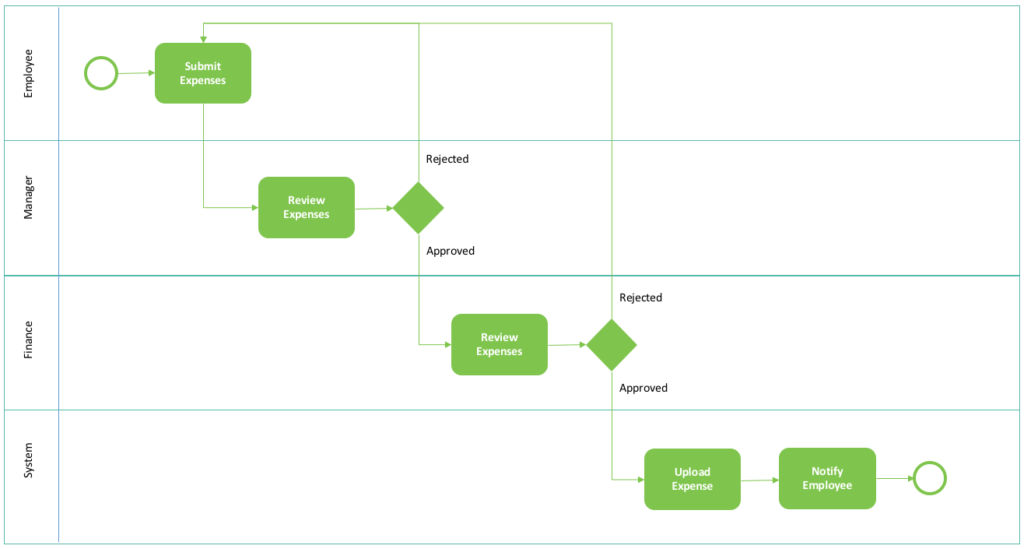
Figure 3: Expense claims process
Decision Management
Management manages by making decisions and by seeing that those decisions are implemented. - Harold S. Geneen
Business users have traditionally been dependent on technology teams for implementing and maintaining business rules in applications. This dependency can be a cause of incorrect implementations and more importantly slow down any response to changes that are needed. A core component of DBP is decision management. Decision management provides a convenient way for both technology teams and business users to capture, automate, test and govern business rules 11.
Consider a simplified version of account opening process. Once an applicant submits new account application, the very first step is to check their credit score. Keeping this rule in the application will cause issues later on when changes are required. For example, organization policy changes, and now the new credit score requirement for opening an account is 725 instead of 700. If this rule was built into the application, then this update will require changes to the application. What if the same rule is used by multiple applications, then multiple applications will have to go through the same upgrade cycle.
On the other hand, if these rules reside outside of applications and are accessible to business users, then any change in organizational policy can be easily applied without involving the technology teams. Another benefit of keeping rules outside of applications is that you can have a single organization-wide rules repository that all applications can access, this ensures that organization policies take effect across applications without going through a long project of changing rules in each and every application.
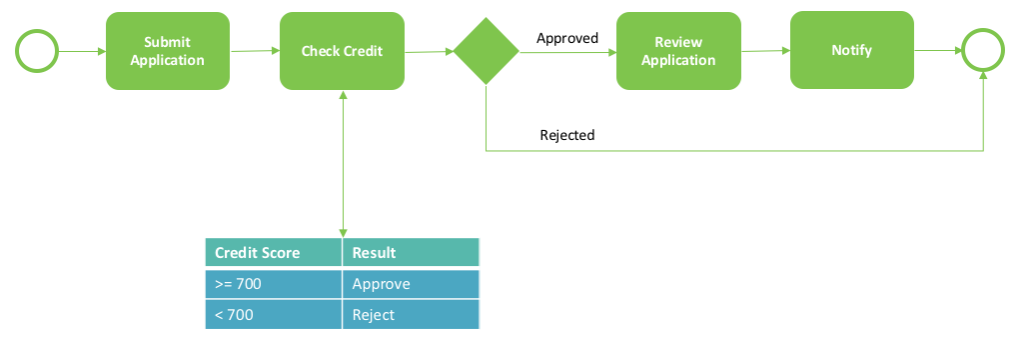
Figure 4: Model of an account opening process
Integrations
A process cannot exist in a silo, in order to deliver real value, it has to integrate with other systems.
In most organizations, especially the ones that have legacy systems or have gone through mergers and acquisitions, there are a lot of systems that do not talk to each other. In absence of any system integrations, standard operating procedures are born that require people to do useless repeatable tasks. These tasks do not create any value for the organization but are necessary just to make things work. People end up filling gaps in technology instead of it being the other way around.
Integration component is a must-have for DBP. Two ways a DBP can reduce these useless human tasks and fill gaps in technology are by providing system integration and robotic process automation (RPA) capabilities.
- Integration Platforms: Integration platforms are specifically designed to handle different types of integrations. Not only do they support most protocols and have a large repository of pre-built connectors, they also have powerful mapping, transformation, and routing capabilities. All of these capabilities are necessary to build complex integrations. Another advantage of using an integration platform is that they prevent integrations from becoming point-to-point, so any changes in source system do not have a huge impact on client systems.
- Robotic Process Automation (RPA): RPA is not the traditional type of integration. RPA tools allow you to train software bots to mimic human actions e.g. open browser, log in, copy-paste data etc. So, in cases where integrations might take a while to build or are difficult to build e.g. legacy systems, RPA provides a great alternative 12.
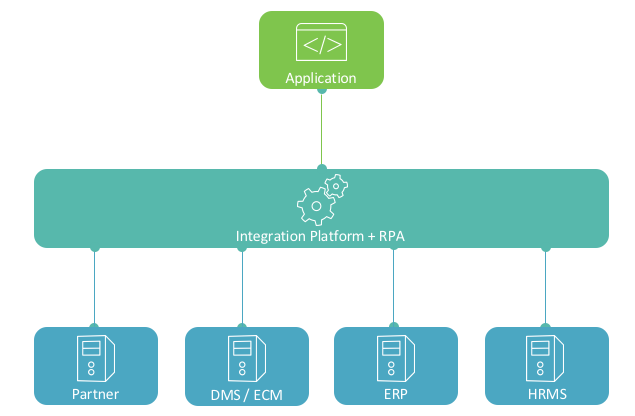
Figure 5: Integrations platform architecture
Data & Analytics
If you cannot measure it, you cannot improve it. - Lord Kelvin
From acquiring new customers to winning elections, data has become the key. Answers to following and many other questions reside in the data.
- Where are different bottlenecks in the process?
- How are different rules performing?
- What are the common integration failure points?
- What is the most popular product?
- What other products did the customer look at?
- Can we recommend any other products to a customer?
- How many complaints have been received for a certain product?
Data and analytics capabilities of DBP should include features such as:
- Sourcing of data from different systems (ETL)
- Creating unified views of entities (DWH)
- Building reports, drill down, slice and dice (BI)
- Identifying key metrics (BI)
- Mining data to find patterns (Data Mining, Process Mining)
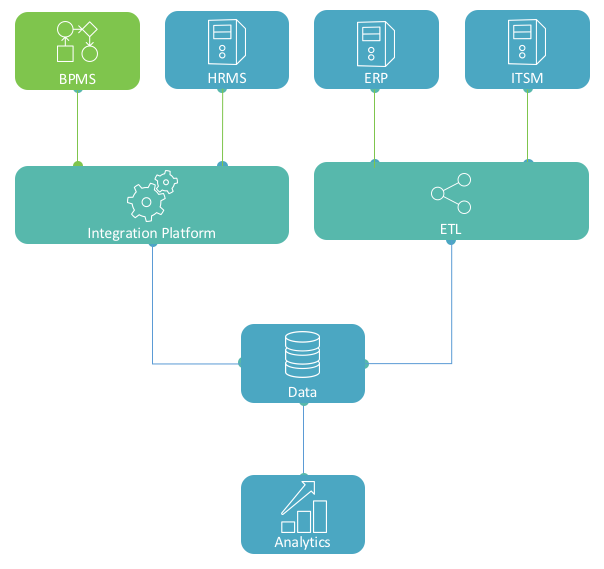
Figure 6: Data sourcing flow
Internet of Things
Analysts are forecasting that by the year 2020 there will be more than 20 billion connected things (devices) and the total revenue from the internet of things (IoT) will easily surpass $2 trillion 13.
A DBP needs to include capabilities of an IoT platform. An IoT platform allows developers to build, deploy and manage IoT applications from one central location in a secure manner. It provides necessary infrastructure and development tools so that developers focus on building applications and not waste time on setups 14.
To better understand how IoT can help organizations, consider the example of a Fleet Management company. Here are a few questions that a Fleet Management company might be interested in answering 15.
- Drivers: How are drivers performing? Are they making unnecessary stops? Are they driving over the speed limit and wasting fuel?
- Vehicles: How is a vehicle performing? Are there any issues that might need immediate attention e.g. low battery?
Without a connected fleet, all this data would come from drivers (which cannot be reliable), or by doing inspections only after a vehicle is back or something breaks down. Now, if the entire fleet was connected, then the vehicle would be transmitting this data automatically and using analytics all these questions and more could be easily answered.
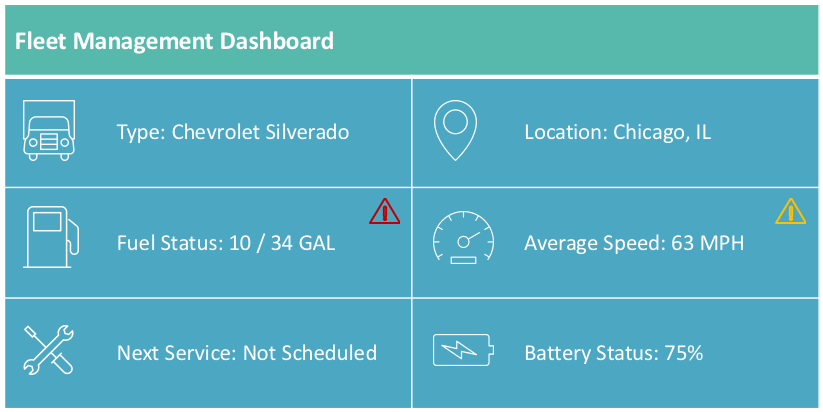
Figure 7: Sample Fleet Management Dashboard
Artificial Intelligence
Artificial Intelligence (AI) is usually defined as the science of making computers do things that require intelligence when done by humans 16.
AI is going to have a huge impact on our future, but AI is not just a single technology, it is a combination of different research areas such as machine learning, deep learning, natural language processing etc. To better understand why AI capabilities need to be part of DBP and how it can help organizations, let's take a look at a couple of examples.
Medical Treatments: Daniel Kahneman a famous psychologist did a lot of work on the psychology of judgment and decision-making. In one of the experiments, his team worked with doctors to identify seven factors that they used to diagnose if an ulcer was malignant. Based on these factors, his team developed a model that could render diagnoses. Next, they fed both the doctors and the model same data, 96 different stomach ulcer images and asked for their diagnosis. In some cases, without telling the doctors they showed the same image twice at random to the same doctor. The resulting data was very interesting, not only did different doctors have different opinions but even the same doctor had different opinions for the same image. The model, on the other hand, had a better prediction rate. 17
Machine Learning (ML) does the same thing, it can consume huge volumes of data to create a model. If we look at medical treatments, the model can use all the data to recommend a course of treatment. We do not have to replace a doctor, but it can augment and help make better decisions.
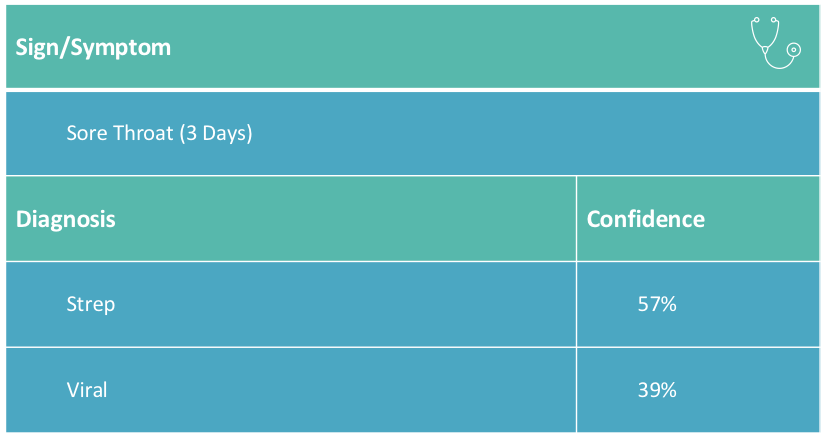
Figure 8: Medical treatment recommendation
Customer Service: To keep existing customers happy and acquire new ones, a good customer service is extremely important for organizations. But depending on an organization's size, customer service department can be a huge cost center. Natural Language Processing (NLP) has improved a lot, now computer programs can not only understand standard sentences, but they can also interpret slang and tone used in the sentence.
As a result, the idea of chatbots is becoming extremely popular in the world of customer service 18. Chatbots can be trained to understand what people are asking and provide relevant responses. For cases where the question is outside of a chatbots training, it can simply redirect them to a specialized human representative. Chatbots can augment customer service representatives, and reduce cost by taking care of the standard queries.
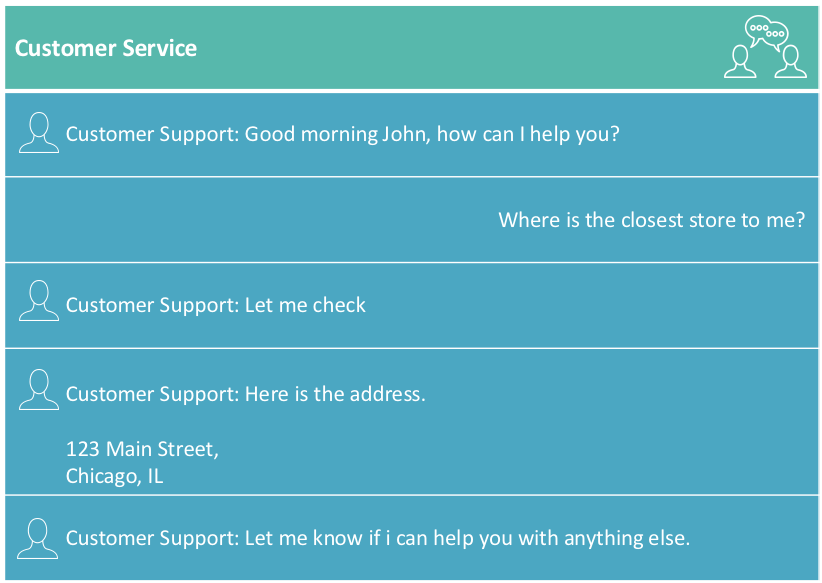
Figure 9: Chatbot sample interaction
Conclusion
It’s so much easier to build code with objects, like Lego blocks, than it is with lines of code. - Matt Calkins
We looked at six key components of a DBP, but before I close this post, I would like to take a quick look at different characteristics of a DBP.
- Unified
- Low-Code
- Cloud-based
Characteristics listed above result in agility, smaller learning curve, reduced support and maintenance costs, reduced time to market and simpler licensing plans.
Organizations need to have Digital Business Platform in their toolbox if they not only want to survive but thrive in this fast-paced and disruptive digital world.
References
- The Nine Elements of Digital Transformation by George Westerman, Didier Bonnet and Andrew McAfee (MIT Sloan Management Review)
- What is Digital Transformation by Adeel Javed
- Is the Digital Business Platform the Future of BPMS?
- Is the Digital Business Platform What BPM Has Been Aiming for All Along?
- Creating a Digital Business Platform by Jim Sinur
- bpmNEXT Keynotes by Keith Swenson
- SoftwareAG Digital Business Platform
- Appian Low-Code Application Development Platform
- Why Use Low-Code Application Development Platforms? by Adeel Javed
- Why Digital Transformation Can't Proceed Without Operational Process Transformation, by Adeel Javed
- A Realistic View of Business Rules Engines
- How To Make BPMS And RPA Work Together
- Gartner Says 8.4 Billion Connected "Things" Will Be in Use in 2017, Up 31 Percent From 2016
- Building Arduino Projects for the Internet of Things: Experiments with Real-World Applications, by Adeel Javed
- 5 Ways The Internet Of Things Revolutionizes Fleet Management, by Jay Krishnan
- What is Artificial Intelligence?, by Jack Copeland
- The Undoing Project, by Michael Lewis
- Ultimate Guide to Leveraging NLP & Machine Learning for your Chatbot, by Stefan Kojouharov
Pi - The Personal Assistant (Raspberry Pi + IBM® Watson) - Part 2
This tutorial is the second in series on developing a Personal Assistant (Pi) using Raspberry Pi and IBM® Watson. Pi will take a picture of an object placed in front of it, classify the picture, provide classification with a score and play the results back to the user.
Note: All tutorials in this series are independent of each other, they simply use the same concepts.
Learning Objectives
At the end of this tutorial you will be able to:
- Play audio on Raspberry Pi using Java
- Take pictures from Raspberry Pi Camera using Java
- Invoke Watson's Visual Recognition service from Java
- Invoke Watson's Text to Speech service from Java
Hardware
Raspberry Pi 3 (RPi3) Model B, Raspberry Pi Camera, Speaker (optional)
Software
Java 8, IBM® Bluemix, JRPiCam Library
Design
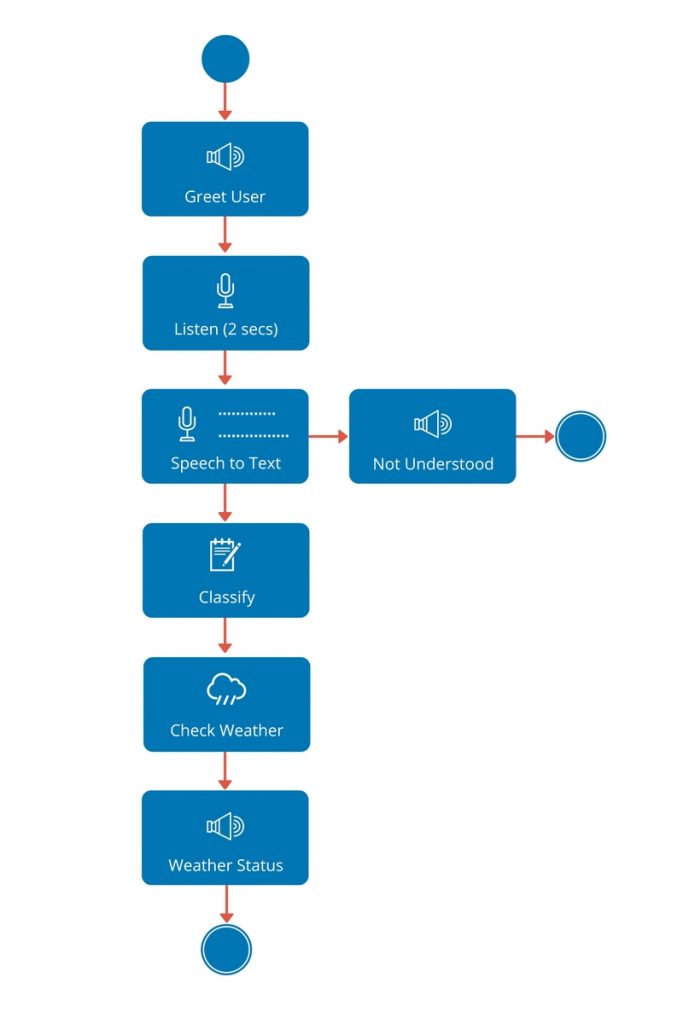
This section provides a high-level design of how Pi - The Personal Assistant will recognize objects. When you run the code from a terminal a new interaction is started and following activities happen.
- Pi greets the user
- Pi waits for 3 seconds
- Pi takes a picture of object placed in front of the camera
- Pi invokes Watson Visual Recognition service, passes the PNG file as input
- IF Watson is able to classify the image THEN
-
- Pi creates a response based on results
- Pi invokes Watson Text to Speech service
- Pi plays the response back to user
- ELSE Pi says "Sorry, I could not recognize the object"

IBM® Watson Setup
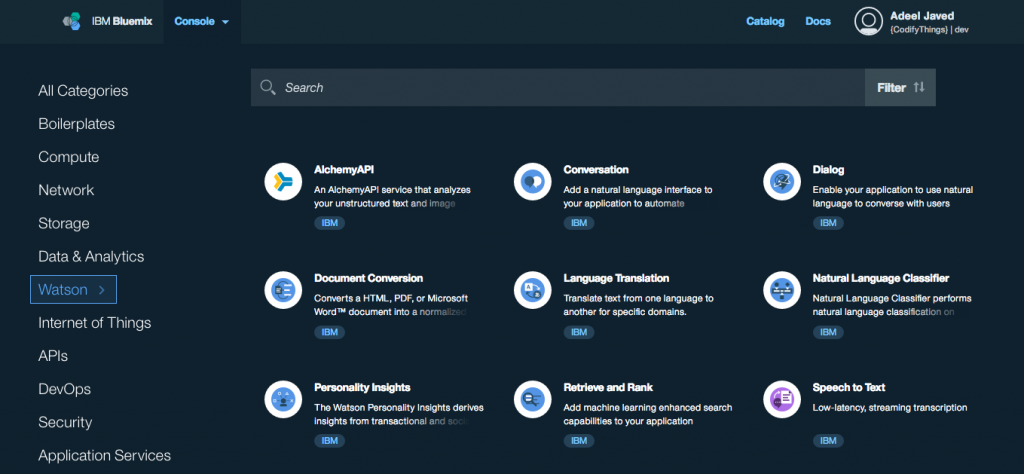
Step 1: Signup for Bluemix.
Step 2: Login to Bluemix, you will be redirected to the Console.

Step 3: Click on Watson.
Step 4: Click on Get started now! + to create a new service.

Step 5: From all Watson services, click on Visual Recognition service.

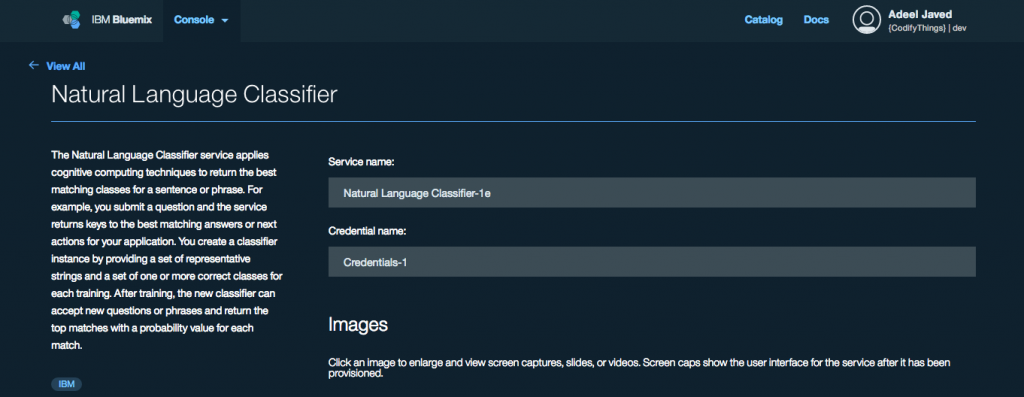
Step 6: Enter Service name and Credentials name (or leave as-is). You can leave the service unbound and select a Pricing Plan that suits you. Click on Create.

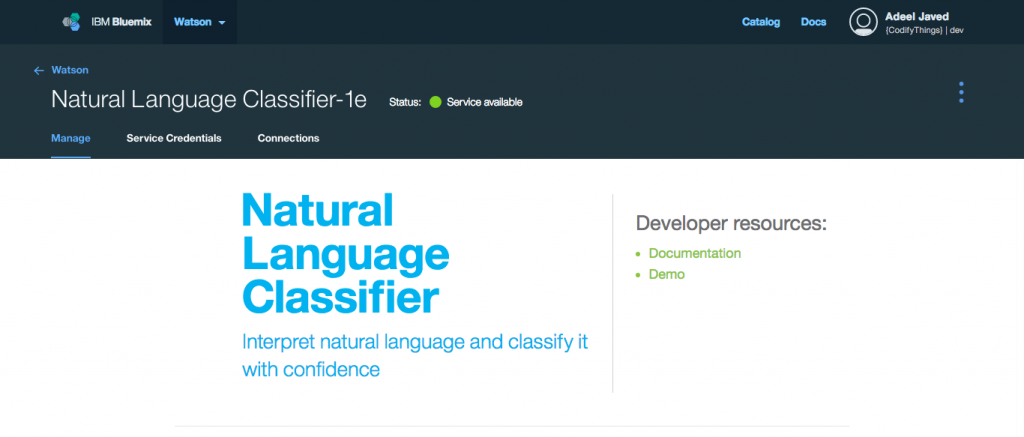
Step 7: Your Visual Recognition service is ready for use.

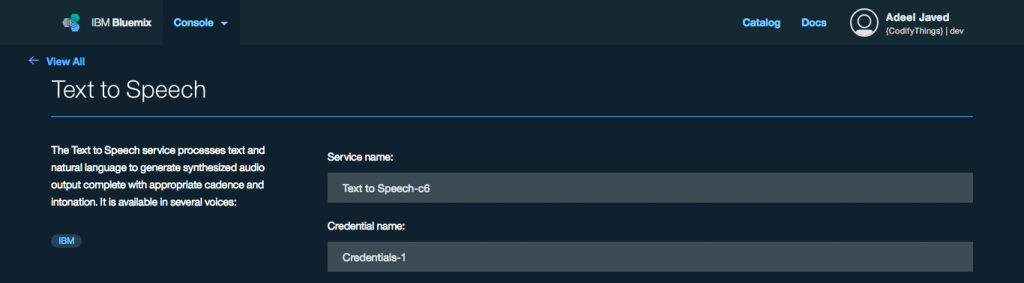
Step 8: Go back to Catalog > Watson and click on + to create Text to Speech service.
Step 9: From all Watson services, click on Text to Speech service.

Step 10: Enter Service name and Credentials name (or leave as-is). You can leave the service unbound and select a Pricing Plan that suits you. Click on Create.

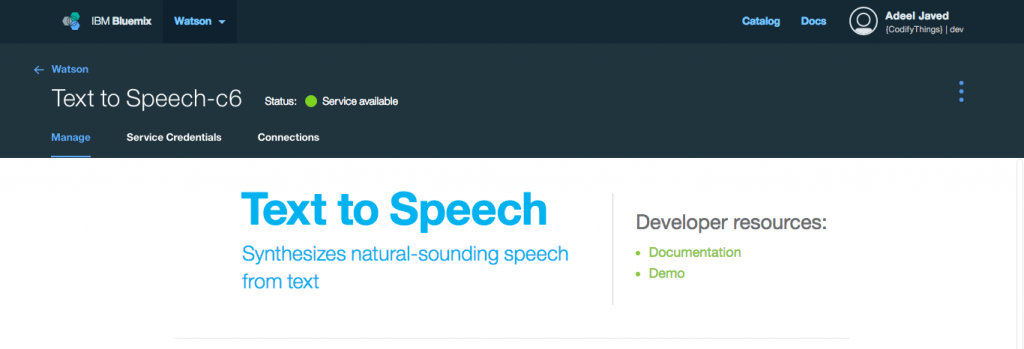
Step 11: Your Text to Speech service is ready for use.

Raspberry Pi Setup
Step 1: Download the code from Github repository.
Step 2: Latest versions of Raspberry Pi comes pre-installed with Java, so you only need to download required dependencies.
- Watson API - Java SDK
- JRPiCam (Java API for Raspberry Pi Camera)
Step 3: Open the Constants.java file in com.codifythings.personalassistant package and copy-paste credentials from Watson services that you created.
Step 4: Run the main class com.codifythings.personalassistant.PersonalAssistant.
Final Product
Next Steps
This wraps up the tutorial. There are quite a few enhancements that you can make to this module e.g. build a robot that finds specific objects or a security camera that only records when there is a person in the vicinity.
Citations
Pi - The Personal Assistant (Raspberry Pi + IBM® Watson) - Part 1
This tutorial is the first in series on developing a Personal Assistant (Pi) using Raspberry Pi and IBM® Watson. Pi will listen to your commands, analyze the command to see if you are asking about the weather or not if you are then it will search for weather data and playback the response.
Learning Objectives
At the end of this tutorial you will be able to:
- Record and play audio on Raspberry Pi using Java
- Invoke Watson's Speech to Text service from Java
- Invoke Watson's Text to Speech service from Java
- Invoke Watson's Natural Language Classifier service from Java
- Fetch weather data from Forecast.io
Hardware
Raspberry Pi 3 (RPi3) Model B, Speaker, USB Mic
Software
Java 8, IBM® Bluemix, Forecast.io
Design
This section provides a high-level design of Pi - The Personal Assistant. When you run the code from a terminal a new interaction is started and following activities happen based on user command.
- Pi greets the user
- Pi listens to user command for 2 seconds
- Pi creates a WAV file of user command
- Pi invokes Watson Speech to Text service, passes the WAV file as input, the service converts it into text
- IF user did not say anything THEN
- Pi says "Sorry, I did not understand that", and ends the interaction
- Pi passes the converted text to Watson Natural Language Classifier service. This service gives you the ability to train Watson. Once trained, Watson can analyze natural language text and provide a confidence level that tells you how relevant the text is to your trained data. So, instead of hard-coding a few conditions that just check if a specific word is present or not, Watson learns and then provides a confidence level.
- IF classification confidence level is less than 50% THEN
- Pi says "Sorry, I did not understand that", and ends the interaction
- Pi looks up weather data from Forecast.io (for now latitude/longitude for Chicago is hard coded)
- Pi creates a response, generates a WAV file, plays it back to the user and ends the interaction
IBM® Watson Setup
Step 1: Signup for Bluemix.
Step 2: Login to Bluemix, you will be redirected to the Console.

Step 3: Click on Watson.
Step 4: Click on Get started now! + to create a new service.

Step 5: From all Watson services, click on Speech to Text service.
Step 6: Enter Service name and Credentials name (or leave as-is). You can leave the service unbound and select a Pricing Plan that suits you. Click on Create.
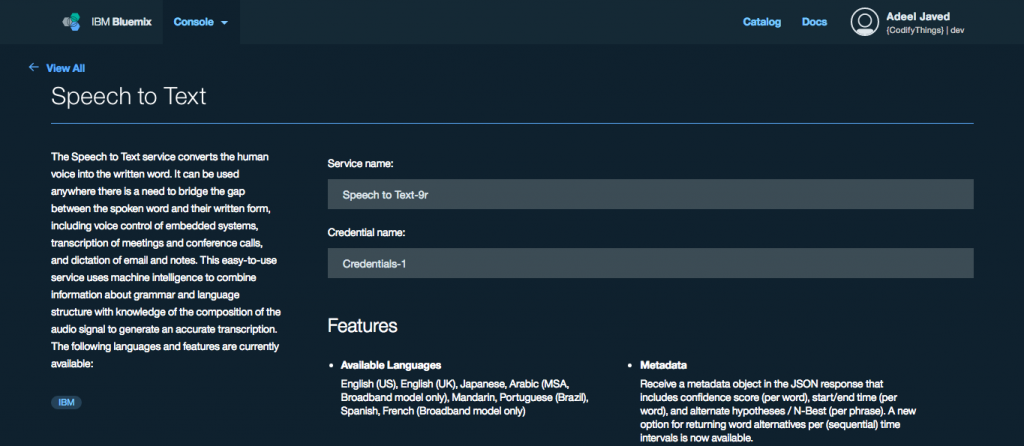
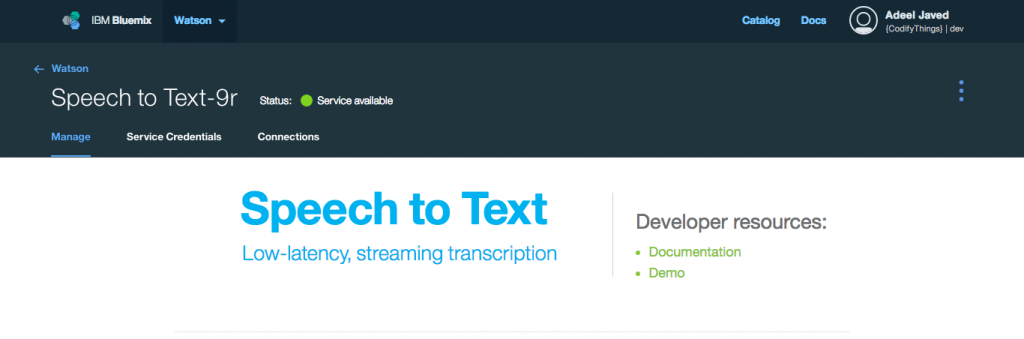
Step 7: Your Speech to Text service is ready for use.
Step 8: Go back to Catalog > Watson and click on + to create Text to Speech service.
Step 9: From all Watson services, click on Text to Speech service.

Step 10: Enter Service name and Credentials name (or leave as-is). You can leave the service unbound and select a Pricing Plan that suits you. Click on Create.
Step 11: Your Text to Speech service is ready for use.
Step 12: Go back to Catalog > Watson and click on + to create Natural Language Classifier service.
Step 13: From all Watson services, click on Natural Language Classifier service.

Step 14: Enter Service name and Credentials name (or leave as-is). You can leave the service unbound and select a Pricing Plan that suits you. Click on Create.
Step 15: Your Natural Language Classifier service is ready for use.
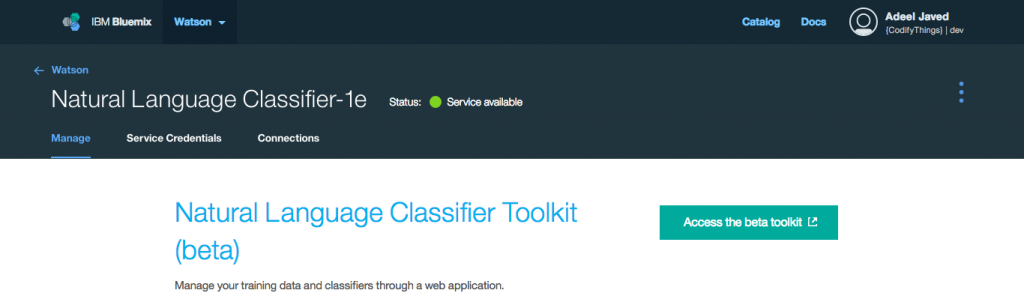
Step 16: All required IBM® Watson services are now ready, but before you can use the Natural Language Classifier service you need to train IBM® Watson to properly classify text i.e. Speech to Text service will convert everything that the user says into text, so how do you find if it is relevant or not. Open your newly created Natural Language Classifier service and click on Manage tab. From Manage tab click on Access the beta toolkit button. This will open the toolkit (you might be required to sign in again and authorize access to your user).
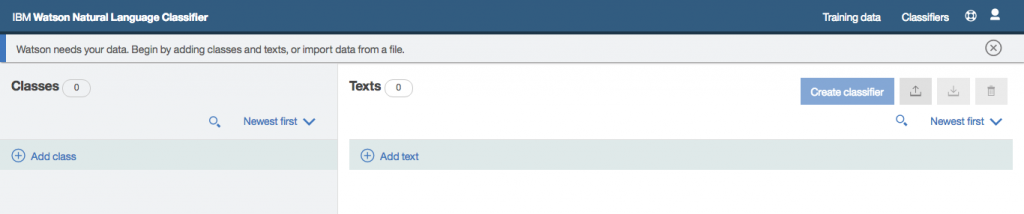
Step 17: Under Classifiers click on Add training data button.

Step 18: Next click on Upload training data button from the top right menu.
Step 19: Select the CSV file that contains your training data (this application uses a slightly modified version of the file provided by IBM, you can download it from here).
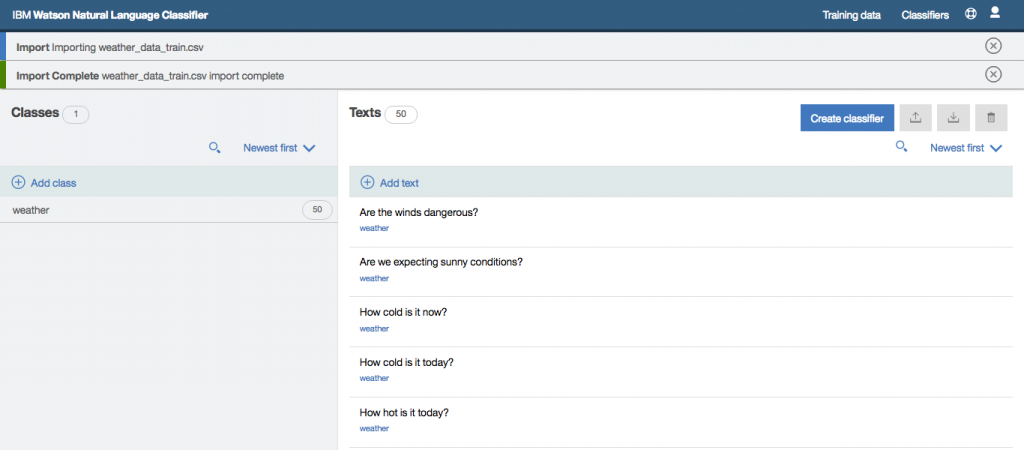
Step 20: Once all training data has been imported click on Create classifier button.
Step 21: Enter a Name for your classifier and click on Create button.
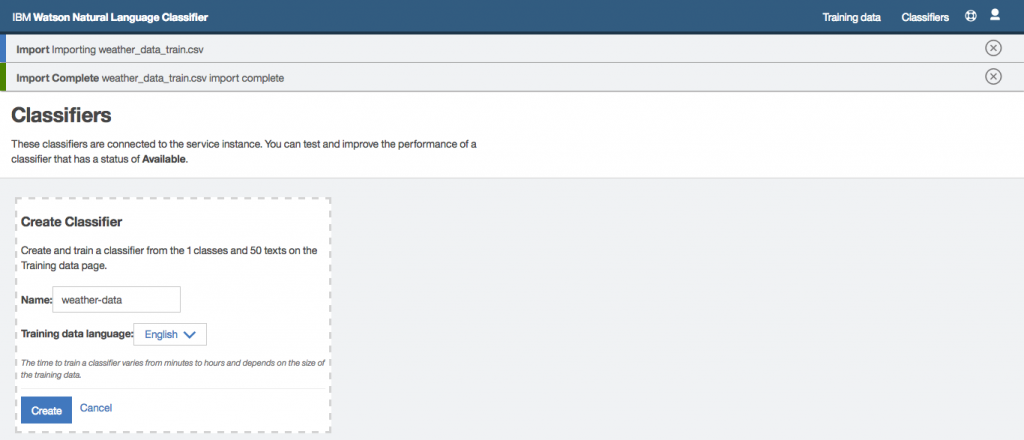
Step 22: You will start seeing messages that training is in progress (this process might take a few minutes).

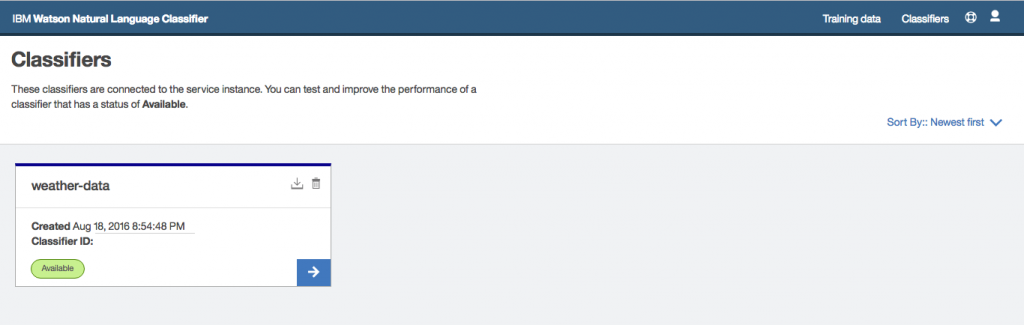
Step 23: Once training is complete you will see the following message, that means your Natural Language Classifier service is trained and ready to be used.
Raspberry Pi Setup
Step 1: Download the code from Github repository.
Step 2: Latest versions of Raspberry Pi comes pre-installed with Java, so you only need to download required dependencies.
Step 3: Open the Constants.java file in com.codifythings.personalassistant package and copy-paste credentials from Watson services that you created. You also need to change the classifier id that you saw in the final step of the last section.
Step 4: Run the main class com.codifythings.personalassistant.PersonalAssistant.
Final Product
Next Steps
This wraps up the tutorial. You can easily add more functionality e.g. traffic information - how long will it take me to get to the office. You simply need to train Watson for additional classifications and based on the classification perform a search.
Another future enhancement could be how this interaction gets triggered. For now, the code was manually run from the command line, but you could improve that by using a switch, a motion sensor or even facial recognition.
Citations
Getting Started with Cayenne IoT - #3: Soil Moisture Monitoring
This is the third tutorial of this series on Cayenne, the first ever drag and drop Internet of Things (IoT) platform. It teaches you how to quickly develop IoT applications using Arduino Yún.
In this tutorial you are going to develop a Soil Moisture Monitoring system using Arduino Yún and Cayenne.
Learning Objectives
At the end of this tutorial you will be able to:
- Read and display data from moisture sensor on dashboard in Cayenne
- Trigger notifications when moisture sensor reading crosses a threshold
Hardware
Note: If the model of Arduino that you are using comes with built-in WiFi capabilities then you do not need a separate WiFi Shield.
- Arduino Yún
- Moisture Sensor
- Breadboard
- Jumper Cables

Software
Circuit
Step 1: Make sure your Arduino is not connected to a power source.
Step 2: Using jumper cables connect power (VNC) and ground (GND) ports on Arduino to power (+) and ground (-) ports on breadboard.
Tip: It is a good practice to use red jumper cable for power (+ / VNC) and black jumper cable for ground (- / GND).
Step 3: Now that your breadboard has a power source, using jumper cables connect power (+) and ground (-) ports of your breadboard to power and ground ports of the moisture sensor.
Step 4: To read soil moisture level, you will need to connect a jumper cable from signal port of the sensor to A0 (Analog) port of your Arduino.
Your circuit is now complete and it should look similar to the figure below.

Cayenne Setup
Step 1: Login to Cayenne.
Step 2: From Dashboard click on Add new... link.

Step 3: Expand Sensors, then select Generic and Analog Input as shown in the figure below.
Note: Cayenne is still in beta version, so not all sensors are available. You can still add your sensor by selecting Generic option.

Step 4: As shown in figure above enter settings of your sensor.
Step 5: Click on Sketch button and copy the code.

Step 6: Start your Arduino IDE, paste the code in a new file and compile.
Note: During compilation the default code for Arduino Yún was throwing an error, so code was slightly modified to #include <YunClient.h>.
Step 7: Click on Step 2: Add Sensor button.

Step 8: Your soil moisture sensor will show up on the dashboard. Upload code to your Arduino device and then switch back to dashboard, within a few seconds dashboard will start showing your sensor readings. These readings automatically get updated, you do not have to write any special code.

Step 9: Cayenne provides ability to trigger notifications depending on device status or sensor readings. Click the gear icon on top-right of your sensor and select Trigger.

Step 10: Trigger settings screen will be displayed.

Step 11: Drag and drop your device in if section and select the soil moisture sensor. Also, select a value and condition for trigger e.g. in this case we have set the condition to be if sensor value is above 845 then trigger.
Note: The reason we selected above is because soil moisture sensor returns readings between 0 and 1023, high value means low moisture.

Step 12: In the then section select Send Email and Add a custom recipient.

Step 13: Click on Save Trigger.

Step 14: You can always enable or disable your trigger by using the button on bottom right.

Step 15: To test the trigger, put your moisture sensor in wet soil, the value will go down. Next take the moisture sensor out of the soil and the value will start going back up.

Step 16: The moment moisture value crosses the threshold (in this case 845) an email will be sent to the recipient that you added in trigger settings.

Getting Started with Cayenne IoT - #2: Temperature Monitoring
This is the second tutorial of this series on Cayenne, the first ever drag and drop Internet of Things (IoT) platform. It teaches you how to quickly develop IoT applications using Arduino Yún.
In this tutorial, you are going to develop a simple Temperature Monitoring System using Arduino Yún and Cayenne.
Learning Objectives
At the end of this tutorial you will be able to:
- Read and display data from temperature sensor on dashboard in Cayenne
Hardware
Note: If the model of Arduino that you are using comes with built-in WiFi capabilities then you do not need a separate WiFi Shield.
- Arduino Yún
- Temperature Sensor (TMP36)
- Breadboard
- Jumper Cables

Software
Circuit
Step 1: Make sure your Arduino is not connected to a power source.
Step 2: Using jumper cables connect power (VNC) and ground (GND) ports on Arduino to power (+) and ground (-) ports on a breadboard.
Tip: It is a good practice to use red jumper cable for power (+ / VNC) and black jumper cable for ground (- / GND).
Step 3: Now that your breadboard has a power source, using jumper cables connect power (+) and ground (-) ports of your breadboard to power and ground ports of the TMP36 sensor.
Step 4: To read temperature values, you will need to connect a jumper cable from the signal port (usually the middle port) of the TMP36 sensor to A0 (Analog) port of your Arduino.
Your circuit is now complete and it should look similar to the figure below.

Cayenne Setup
Step 1: Login to Cayenne.
Step 2: From Dashboard click on Add new... link.

Step 3: Expand Sensors, then select Temperature and TMP36 as shown in the figure below.

Step 4: As shown in the figure above, enter settings of your sensor.
Note: Selection in Connectivity drop-down depends on the type of sensor you are using. You have three options, in this case, Digital, Analog, and Virtual. Virtual reads analog data and according to the selected sensor converts the value into the correct format. For example, TMP36 will return data in voltage, so you will need to write a formula to calculate correct value. Choosing Virtual simply does that for you.
Step 5: Click on Sketch button and copy the code.

Step 6: Start your Arduino IDE, paste the code in a new file and compile. Make sure the virtual port in code is V0 since your temperature sensor is connected to A0.
Note: During compilation, the default code for Arduino Yún was throwing an error, so the code was slightly modified to #include <YunClient.h>.
Step 7: Click on Step 2: Add Sensor button.

Step 8: Your temperature sensor will show up on the dashboard.

Step 9: Upload the code to your Arduino device and then switch back to the dashboard, within a few seconds dashboard will start showing your sensor readings. These readings automatically get updated, you do not have to write any special code.

Step 10: Cayenne provides you with a few different options to view sensor data on the dashboard. Click the gear icon on top-right of your sensor and select Settings.

Step 11: From Settings screen you have the option to change the widget.

Step 12: Choose Line Chart and Save the Settings. The dashboard will update to show sensor readings in a line chart. There are a few other widgets available as well, and we will try those in upcoming tutorials.

Next Steps
In the next tutorial, we are going to develop a Soil Moisture Monitoring System using Arduino and Cayenne.
Getting Started with Cayenne IoT - #1: Arduino Setup
This article is the first in a series on Cayenne, the first ever drag and drop Internet of Things (IoT) platform. It teaches you how to quickly develop IoT applications using Arduino Yún.
In this tutorial, you are going to connect your Arduino device to Cayenne.
Learning Objectives
At the end of this tutorial you will be able to:
- Setup your Arduino device for Cayenne
Hardware
Note: If the model of Arduino that you are using comes with built-in WiFi capabilities then you do not need a separate WiFi Shield.
- Arduino Yún
Software
Cayenne Setup
Step 1: Register for a free account with Cayenne.
Step 2: Login to Cayenne. As a first time visitor, you will be prompted to choose a device to start your project. Currently, you can choose between a Raspberry Pi and an Arduino. For this tutorial, choose Arduino.

Step 3: On the next screen you will be presented with simple to follow instructions, follow all the instructions step-by-step. Once completed, click Next.

Step 4: On the final step, select your Arduino board from the list. In this tutorial, we are using Arduino Yún. As soon as you select a board, AUTH TOKEN FOR THIS DEVICE field will be populated with a unique authentication token. You will need this later on in the code.
Note: Based on the board that you select, you can also specify the internet connectivity mode that you will be using. For example, Arduino Yún comes with a built-in WiFi so no additional Ethernet shield or Wireless shield is required. On the other hand, if you are using an Arduino Uno, in that case, you will need to attach an internet connectivity shield. Specifying the shield here will generate the corresponding code.

Step 5: Click on Sketch button corresponding to your board and shield, and copy the code.

Step 6: Start your Arduino IDE, paste the code in a new file and compile.
Note: During compilation, the default code for Arduino Yún was throwing an error, so the code was slightly modified to #include <YunClient.h>.

Step 7: Upload code to your Arduino device and open the serial monitor.
Note: Make sure you select 9600 baud on your serial monitor, it should be same as the Serial.begin(9600) in your code.

Step 8: The moment you see output similar to shown above in your serial monitor, switch back to the Cayenne dashboard. Your device should have been successfully added and show up in the dashboard.

Next Steps
In the next tutorial, we are going to develop a simple Temperature Monitoring System using Arduino and Cayenne.

IoT Prototyping Mobile App - MQTT Viewer w/ CloudMQTT
MQTT Viewer is a simple, configurable & ready to use internet of things (IoT) client. This app has been designed to help you get started with your IoT journey. Simply configure your MQTT server details, and start receiving events in the app immediately. Great for prototyping!

Learning Objectives
At the end of this post you will be able to:
- Configure MQTT Viewer with cloudmqtt.com
CloudMQTT Setup
Step 1: Register with CloudMQTT and login (they offer a Free plan as well).
Step 2: Click on Control Panel, this will take you to the dashboard.

Step 3: Create on + Create to create a new instance.
Step 4: On the instance setup screen, enter Name, select a Plan (free plan is available as well) and click on Create button.

Step 5: From Control Panel, click on Details button to open instance console.

Step 6: Instance console screen provides quite a few options to manage and view statistics of the MQTT instance.

Step 7: CloudMQTT requires clients to authenticate, so next you need to create a new user. Under Manage Users, enter username and password and click on Save to create a new user.


Step 7: Finally you need to provide required permissions to your newly created user. Under ACLs, select newly created user, enter the topic which this user can read/write and then check the Read Access? and Write Access? checkboxes.


Your CloudMQTT setup is complete and is ready to receive messages. You can test your instance by using Websocket UI provided in the console.
App Configurations
Step 1: Download MQTT Viewer from Play Store.
Step 2: Open MQTT Viewer and select Settings from the toolbar.
Step 3: In order to configure a new MQTT server, click on Server.
Step 4: Tap on the Host setting to edit. Enter m12.cloudmqtt.com and click Ok (make sure to copy this information from your CloudMQTT instance console).
Step 5: Tap on the Port setting to edit. Enter 14614 and click Ok (make sure to copy this information from your CloudMQTT instance console).
Step 6: Tap on the Topic setting to edit. Enter your topic name here, for this post we are using codifythings/mqtt and click Ok.
Step 7: Tap on the Device setting to edit. Enter your device name, for this post we are using androidClient and click Ok.
Step 8: CloudMQTT requires clients to authenticate, so tap on Enable Authentication.
Step 9: Tap on the Username setting to edit. Enter the username for the user that your created in the previous step and click Ok.
Step 10: CloudMQTT requires clients to authenticate. So tap on the Password setting to edit. Enter the password for the user that you created in the previous step and click Ok.
Leave QoS fields as-is. Your Server settings should look similar to the screenshot below.

Step 11: Click on the back button, and go to Message setting.
Step 12: If you are sending plain data, then leave the setting as-is i.e. do not enable JSON format and skip step 10. If you are publishing data to MQTT server in JSON format, then enable this setting and follow step 13.
Step 13: Tap on the Data Key setting to edit. You need to specify which field in the JSON message contains your data. For this tutorial, we are using moisture and click Ok. For example, if the message being published to MQTT server was {temperature: 45, moisture: 35}, then by specifying moisture in Data Key we are asking the app to use its value which in this case will be 35.
Your Message settings should look similar to the screenshot below.

Step 14: (Optional) Click on the back button and go to Notifications setting.
Step 15: (Optional) If you want the app to create a notification, then enable this setting.
As soon as you go back to the main screen, the app will connect to the new MQTT server settings (in the case of an error, a snack bar will be displayed with the error message). For this tutorial, we also configured the title, color theme, icon and data visualization, screenshot below shows the final product. If you want to change the color theme, icon or data visualization look at rest of the settings here.

Download
Disclaimer: This mobile app has only been designed for prototyping purposes, and is not production ready.
IoT Prototyping Mobile App - MQTT Viewer w/ DIoTY
MQTT Viewer is a simple, configurable & ready to use internet of things (IoT) client. This app has been designed to help you get started with your IoT journey. Simply configure your MQTT server details, and start receiving events in the app immediately. Great for prototyping!
Learning Objectives
At the end of this post you will be able to:
- Configure MQTT Viewer with dioty.co
DIoTY Setup
Step 1: Register with DIoTY and login (they offer a Free plan as well).
Step 2: Click on Get Started, this will take you to the dashboard with connection details.
Note: When you register, an email will be sent to you containing the password.

App Configurations
Step 1: Download MQTT Viewer from Play Store.
Step 2: Open MQTT Viewer and select Settings from the toolbar.
Step 3: In order to configure a new MQTT server, click on Server.
Step 4: Tap on the Host setting to edit. Enter mqtt.dioty.co and click Ok (make sure to copy this information from your DIoTY dashboard).
Step 5: Tap on the Port setting to edit. Enter 1883 and click Ok (make sure to copy this information from your DIoTY dashboard).
Step 6: Tap on the Topic setting to edit. Enter your topic name here, for this post we are using /codifythings@gmail.com/mqtt and click Ok.
Note: DIoTY requires that all your topic names start with /you-username/, for us, it was /codifythings@gmail.com/. This information is provided as part of connection details.
Step 7: Tap on the Device setting to edit. Enter your device name, for this post we are using androidClient and click Ok.
Step 8: DIoTY requires clients to authenticate. So tap on Enable Authentication.
Step 9: Tap on the Username setting to edit. Enter the username for the user that you created in the previous step and click Ok.
Step 10: Tap on the Password setting to edit. Enter the password for the user that you received in the email and click Ok.
Leave QoS fields as-is. Your Server settings should look similar to the screenshot below.

Step 11: Click on the back button, and go to Message setting.
Step 12: If you are sending plain data, then leave the setting as-is i.e. do not enable JSON format and skip step 10. If you are publishing data to MQTT server in JSON format, then enable this setting and follow step 13.
Step 13: Tap on the Data Key setting to edit. You need to specify which field in the JSON message contains your data. For this tutorial, we are using temperature and click Ok. For example, if the message being published to MQTT server was {temperature: 45, moisture: 35}, then by specifying temperature in Data Key we are asking the app to use its value which in this case will be 45.
Your Message settings should look similar to the screenshot below.

Step 13: (Optional) Click on the back button and go to Notifications setting.
Step 14: (Optional) If you want the app to create a notification, then enable this setting.
As soon as you go back to the main screen, the app will connect to the new MQTT server settings (in the case of an error, a snack bar will be displayed with the error message). For this tutorial, we also configured the title, color theme, icon and data visualization, screenshot below shows the final product. If you want to change the color theme, icon or data visualization look at rest of the settings here.

Download
Disclaimer: This mobile app has only been designed for prototyping purposes, and is not production ready.
IoT Prototyping Mobile App - MQTT Viewer w/ Mosquitto Server
MQTT Viewer is a simple, configurable & ready to use internet of things (IoT) client. This app has been designed to help you get started with your IoT journey. Simply configure your MQTT server details, and start receiving events in the app immediately. Great for prototyping!
Learning Objectives
At the end of this post you will be able to:
- Configure MQTT Viewer with test.mosquitto.org
Disclaimer: test.mosquitto.org is a publicly available instance of MQTT, so the data you publish might be available to others.
App Configurations
Step 1: Download MQTT Viewer from Play Store.
Step 2: Open MQTT Viewer and select Settings from the toolbar.
Step 3: In order to configure a new MQTT server, click on Server.
Step 4: Tap on the Host setting to edit. Enter test.mosquitto.org and click Ok.
Step 5: Tap on the Port setting to edit. Enter 1883 and click Ok.
Step 6: Tap on the Topic setting to edit. Enter your topic name here, for this post we are using codifythings/mqtt and click Ok.
Step 7: Tap on the Device setting to edit. Enter your device name, for this post we are using androidClient and click Ok.
Since this is a publicly available instance of MQTT so it does not require authentication. Leave Username, Password and QoS fields as-is. Your Server settings should look similar to the screenshot below.

Step 8: Click on the back button, and go to Message setting.
Step 9: If you are sending plain data, then leave the setting as-is i.e. do not enable JSON format and skip step 10. If you are publishing data to MQTT server in JSON format, then enable this setting and follow step 10.
Step 10: Tap on the Data Key setting to edit. You need to specify which field in the JSON message contains your data. For this tutorial, we are using light and click Ok. For example, if the message being published to MQTT server was {light: 25, temperature: 45}, then by specifying light in Data Key we are asking the app to use its value which in this case will be 25.
Your Message settings should look similar to the screenshot below.

Step 11: (Optional) Click on the back button and go to Notifications setting.
Step 12: (Optional) If you want the app to create a notification, then enable this setting.
As soon as you go back to the main screen, the app will connect to the new MQTT server settings (in the case of an error, a snack bar will be displayed with the error message). For this tutorial, we also configured the title, color theme, icon and data visualization, screenshot below shows the final product. If you want to change the color theme, icon or data visualization look at rest of the settings here.

Download
Disclaimer: This mobile app has only been designed for prototyping purposes, and is not production ready.
IoT Prototyping Mobile App - MQTT Viewer w/ HiveMQ
MQTT Viewer is a simple, configurable & ready to use internet of things (IoT) client. This app has been designed to help you get started with your IoT journey. Simply configure your MQTT server details, and start receiving events in the app immediately. Great for prototyping!
Learning Objectives
At the end of this post you will be able to:
- Configure MQTT Viewer with broker.hivemq.com
Disclaimer: broker.hivemq.com is a publicly available instance of MQTT, so the data you publish might be available to others.
App Configurations
Step 1: Download MQTT Viewer from Play Store.
Step 2: Open MQTT Viewer and select Settings from the toolbar.
Step 3: In order to configure a new MQTT server, click on Server.
Step 4: Tap on the Host setting to edit. Enter broker.hivemq.com and click Ok.
Step 5: Tap on the Port setting to edit. Enter 1883 and click Ok.
Step 6: Tap on the Topic setting to edit. Enter your topic name here, for this post we are using codifythings/mqtt and click Ok.
Step 7: Tap on the Device setting to edit. Enter your device name, for this post we are using androidClient and click Ok.
Since this is a publicly available instance of MQTT so it does not require authentication. Leave Username, Password and QoS fields as-is. Your Server settings should look similar to the screenshot below.

Step 8: Click on the back button, and go to Message setting.
Step 9: If you are sending plain data, then leave the setting as-is i.e. do not enable JSON format and skip step 10. If you are publishing data to MQTT server in JSON format, then enable this setting and follow step 10.
Step 10: Tap on the Data Key setting to edit. You need to specify which field in the JSON message contains your data. For this tutorial, we are using humidity and click Ok. For example, if the message being published to MQTT server was {temperature: 45, humidity: 35}, then by specifying humidity in Data Key we are asking the app to use its value which in this case will be 35.
Your Message settings should look similar to the screenshot below.

Step 11: (Optional) Click on the back button and go to Notifications setting.
Step 12: (Optional) If you want the app to create a notification, then enable this setting.
As soon as you go back to the main screen, the app will connect to the new MQTT server settings (in the case of an error, a snack bar will be displayed with the error message). For this tutorial, we also configured the title, color theme, icon and data visualization, screenshot below shows the final product. If you want to change the color theme, icon or data visualization look at rest of the settings here.

Download
Disclaimer: This mobile app has only been designed for prototyping purposes, and is not production ready.