
Getting started with IBM® IoTF - #3: Data Storage
Part 3 of this series on IBM® Internet of Things Foundation (IoTF) teaches you how to store events published by a device in Cloudant NoSQL database.
In this tutorial, you are going to create a Node-RED flow that will receive and store event data generated by the IoT application you developed in part 1 of this series.

Learning Objectives
At the end of this tutorial you will be able to:
- Create a new database in Cloudant NoSQL DB
- Create a Node-RED flow to receive MQTT events
- Use Node-RED flow to save events in the database
IBM IoTF Setup
Login to Bluemix, you will be redirected to the Dashboard.
Open your IoTF application (WeatherMonitoringSystem) that was developed in part 1. If you look at services included in your application, you will notice that Cloudant NoSQL DB was already added. All IoT applications created using the IoTF boilerplate by default include Cloudant NoSQL DB.

First, you need to create a new database in Cloudant NoSQL DB that will be used to store data. Under Services, click on Cloudant NoDQL DB.

Click on Launch button to open Cloudant NoSQL DB dashboard.

Click on Create Database to create a new database. Enter weather-db and click Create.

The newly created database is now visible on Cloudant dashboard.

Switch back to Bluemix dashboard and click the URL on top to open Node-RED instance of your IoT application.

Click on Go to your Node-RED flow editor to open Node-RED editor.

By default there will be a flow in the editor, you can leave Sheet 1 as-is or delete it. Click on + from top-right to create a new flow sheet.

Double click flow name (sheet name), enter WeatherDBStorageFlow and click Ok.

From input section drag and drop ibmiot node.

At this point, your flow should look as follows.

Double click ibmiot node to set properties as shown in the figure below.

Change Authentication from Quickstart to Bluemix Service. Leave Input Type as Device Event. For Device Type, Device Id and Event select All (you can provide specific information as well). Set Format as json, since that is the format device is using to publish data. Click Ok.

From storage section drag and drop cloudant node.

Double click the cloudant node to set properties as shown in the figure below. Since your IoT app already has a Cloudant NoSQL DB service added, so you do not need to manually enter credentials, simply select your Cloudant NoSQL DB service from the Service drop-down. Enter weather-db in Database field, this is the same name you used while creating a new database in Cloudant. Select insert from Operation. Click Ok.

Connect ibmiot and cloudant nodes.

Click Deploy to make data storage flow available.
Final Product
Make sure your Arduino is powered on and code from part 1 has been deployed. As soon as the code has been deployed, open serial monitor and you will start seeing data publish messages.

Launch Cloudant NoSQL DB dashboard and open your database (weather-db). The All Documents link will list all the JSON documents with humidity and temperature data that have been stored so far.

Click on any of the documents to see details.

Getting started with IBM® IoTF - #2: Data Visualization
Part 2 of this series on IBM® Internet of Things Foundation (IoTF) teaches you how to visualize published data using IBM® IoT Real-Time Insights service.

In this tutorial, you are going to create a real-time dashboard to visualize IoT application data that you developed in part 1 of this series.
Learning Objectives
At the end of this tutorial you will be able to:
- Add IoT Real-Time Insights service to your Bluemix app
- Connect IoTF service as a data source for IoT Real-Time Insights service
- Create a dashboard using IoT Real-Time Insights service
IBM IoTF Setup
Login to Bluemix, you will be redirected to the Dashboard.
Open your IoTF application (WeatherMonitoringSystem) and click on + ADD A SERVICE OR API.

In Catalog, select Internet of Things > IoT Real-Time Insights service.

On service properties screen leave Service name and default Plan as-is or provide your own values. Click Create button.

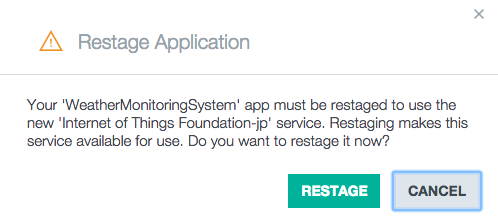
In order to add this new service to your app, Bluemix will need to restage the application. Once prompted click Restage button.

Once restaging is complete, click on IoT Real-Time Insights service in your application.

Service details page will open with options to Add a data source, Go to DOCS and Launch IoT Real-Time Insights Dashboard. For insights service to work, you will first need to add a new data source. Click on Add a data source button.

You might be asked to sign in again with your IBM ID.

Once you are on IoT Real-Time Insights dashboard under Setup > Manage Data Sources tab, click Add New Data Source button.

Enter Name, Organization ID, API Key and Authentication Token.
Note: You will be able to locate Organization ID, API Key and Authentication Token from your IoTF dashboard.

From Bluemix Dashboard launch IoTF Dashboard.

From IoTF Dashboard click on Access > API Key tab.

Click on Generate API Key.

Switch back to IoT Real-Time Insights dashboard and enter API Key and Authentication Token from the previous step.

Click tick to save Data Source.

From Devices > Browse Devices, you should see the devices that you registered with IoTF. Currently, it might show No data point defined.
Go to Devices > Manage Schemas and click Add new message schema.

Click on + Link data source, a link new data Source dialog box will open.

Click on magnifying glass to search existing data sources.

Select the WeatherDS datasource that you created earlier.

Next, select Device Type as WeatherDT and leave Event as + (to capture all events being published by the device). Click Ok to complete data source addition.

Next, you need to add data points in the schema, these data points will be used for all visualizations (data points are objects/fields being sent as part of JSON message). Click on + Add data point to open Add Data Points dialog box.

If your IoT app from part 1 is running and publishing data to IoTF then select Add from connected device. The system will automatically load data points being sent by the device.

Select the data points you might want to see on the dashboard and click Ok.

Both your data source and data points have been added, enter Message Schema name and click Ok.

Note: To plot a chart on the dashboard you will need to change the data type of both humidity and tempC from String to Float. This can be done by clicking on pencil/edit icon on the previous screen.

Once data points have been added you will see the newly added Message schema.

Switch to Dashboards > Overview to view the default dashboard.

You are going to create your own dashboards. Switch to Dashboards > Browse Dashboards and click on + Add new dashboard.

Enter Dashboard name, you can change icons and a few other properties. Click the tick to add the dashboard.

Click on newly created dashboard Weather Realtime Dashboard.

Click on Add new component.

Select Chart.

Click on Add line to chart. Select Device, Parameter, and Color. Click on tick button.

Add both humidity and tempC data points as lines in the chart.

You can add other available components as well, but for the purposes of this tutorial only real-time chart component has been added.

Final Product
Make sure your Arduino is powered on and code from part 1 has been deployed. As soon as the code has been deployed, open serial monitor and you will start seeing data publish messages.
Login to IoT Real-Time Insights dashboard and open your custom dashboard. The chart will start displaying all the sensor readings in real time.

Getting Started with IBM® IoTF - #1: Data Publish
This article is the first in a series on IBM® Internet of Things Foundation (IoTF). It teaches you how to develop an Internet of Things (IoT) application in IBM® Bluemix.
In this tutorial, you are going to develop a simple Weather Monitoring IoT application. As the figure below shows, this IoT application will sense temperature and humidity data and publish it to IoTF using the MQTT protocol.
Learning Objectives
At the end of this tutorial you will be able to:
- Design an IoT device that senses temperature and humidity
- Create an IoT application and add services in Bluemix
- Setup device type and devices in IoTF
- Write code to publish device data to IoTF
- View device data in IoTF
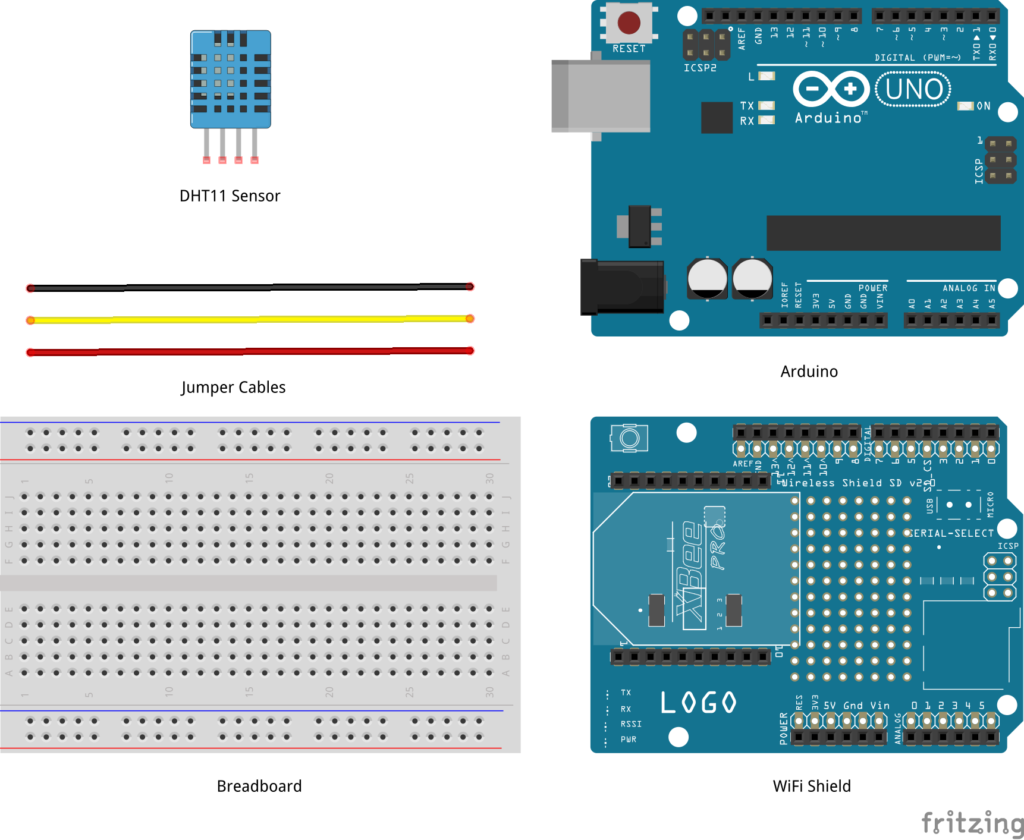
Hardware
Note: If the model of Arduino that you are using comes with built-in WiFi capabilities then you do not need a separate WiFi Shield.
- Arduino Uno
- Arduino WiFi Shield
- DHT11 (Humidity + Temperature Sensor)
- Jumper Cables
 Software
Circuit
Step 1: Make sure your Arduino is not connected to a power source.
Note: If the model of Arduino that you are using comes with built-in WiFi capabilities then you do not need a separate WiFi Shield and can skip this step.
Step 2: Attach WiFi Shield or Ethernet Shield on top of Arduino.
Step 3: Using jumper cables connect power (VNC) and ground (GND) ports on Arduino to power (+) and ground (-) ports on the breadboard.
Tip: It is a good practice to use red jumper cable for power (+ / VNC) and black jumper cable for ground (- / GND).
Step 4: Now that your breadboard has a power source, using jumper cables connect power (+) and ground (-) ports of your breadboard to power and ground ports of the DHT11 sensor.
Step 5: To read temperature and humidity values, you will need to connect a jumper cable from signal port of DHT11 sensor to D3 (Digital) port of your Arduino.
Your circuit is now complete and it should look similar to figures below.
 IBM IoTF Setup
Signup for Bluemix.
Login to Bluemix, you will be redirected to the Dashboard.
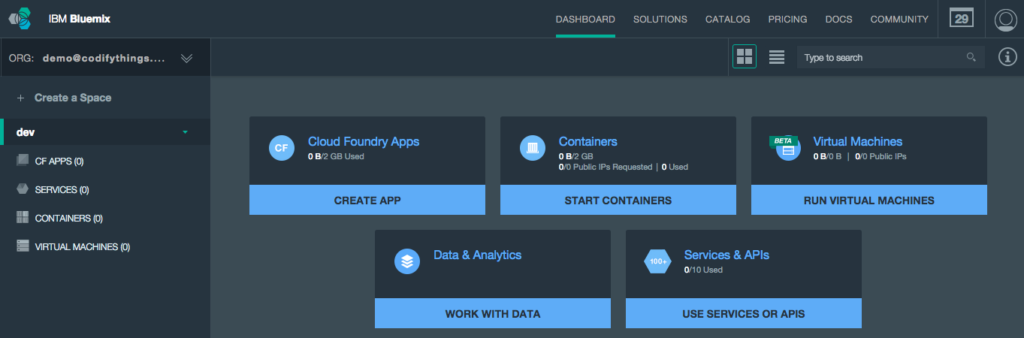 Select Catalog from the top menu.
![]()
Select Internet of Things Foundation Starter from Starters > Boilerplates.

Enter WeatherMonitoringSystem in the Name field (application name has to be unique across Bluemix). Click Create button.
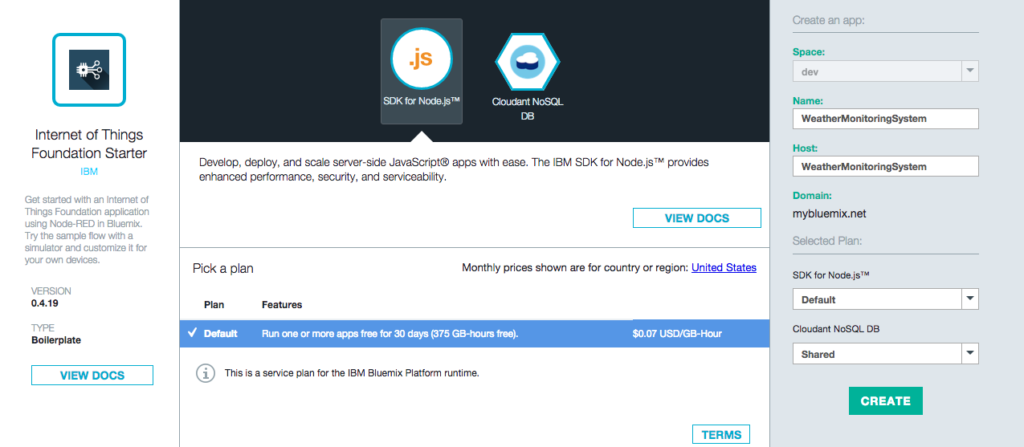
Bluemix will take some time to create your application. Once your application is ready it will be available at http://.mybluemix.net URL (in the case of this tutorial it will be http://WeatherMonitoringSystem.mybluemix.net).

To check if your application is running click on the link provided above. If an instance of Node-RED opens then your application was created as expected.
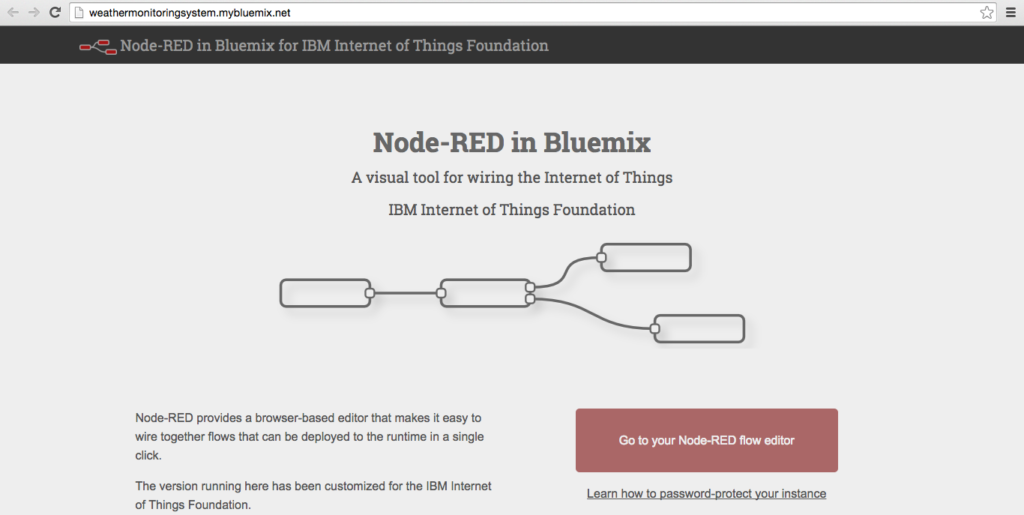
Application created using IoTF boilerplate uses Node.js as the runtime and by default includes a Cloudant NOSQL DB service and a Node-RED flow (this service will be used in upcoming tutorials).
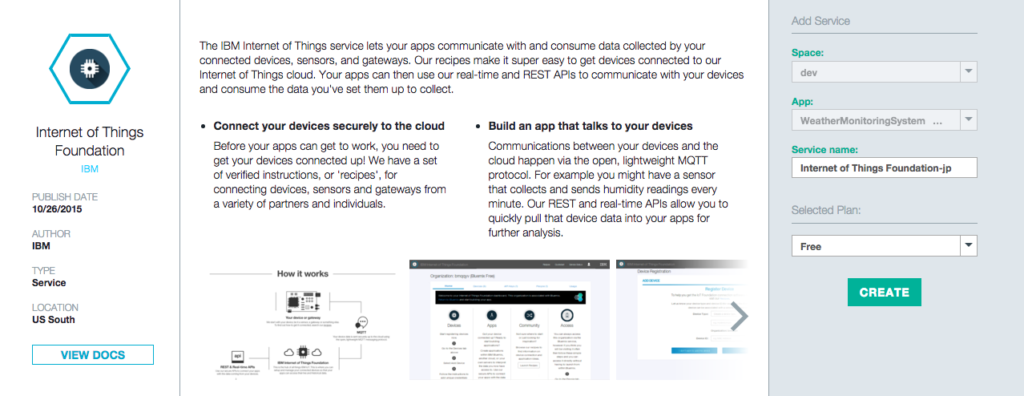
To register your devices with IoTF you need to add Internet of Things Foundation service to the app. From Dashboard open WeatherMonitoringSystem application, and click on + ADD A SERVICE OR API button. You will be redirected to Catalog. Under Services select Internet of Things and click on Internet of Things Foundation service.

On service properties screen, leave Service name and default plan Free as-is or change according to your requirements. Click on Create button. Bluemix will add this service to your app.
Bluemix will need to re-stage your application before it can be added to the app.
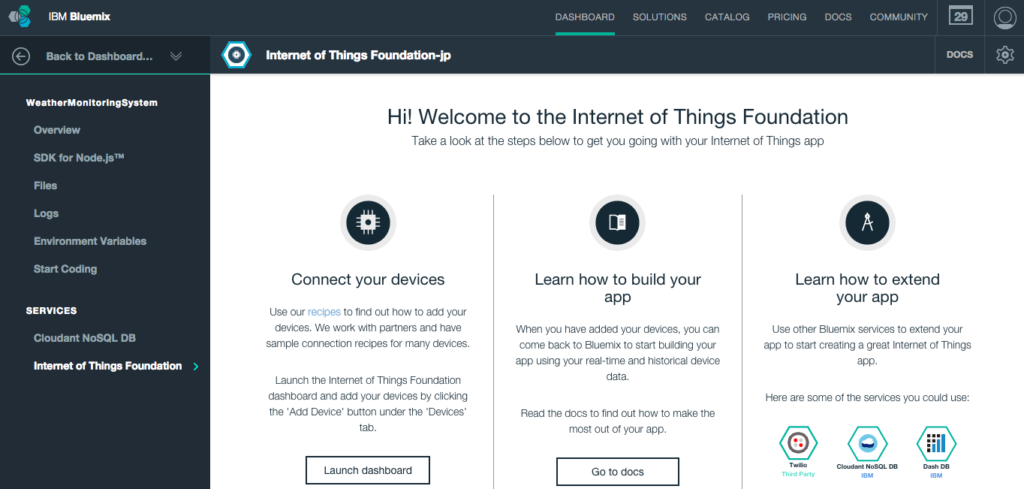
Once the previous step is complete, on your Dashboard you will be able to see newly added IoTF service in WeatherMonitoringSystem application. From Dashboard under Services section click on IoTF service to open details screen.

The service details screen provides you options to Launch dashboard, Go to docs and Find out how. Click on Launch dashboard to open IoTF dashboard.
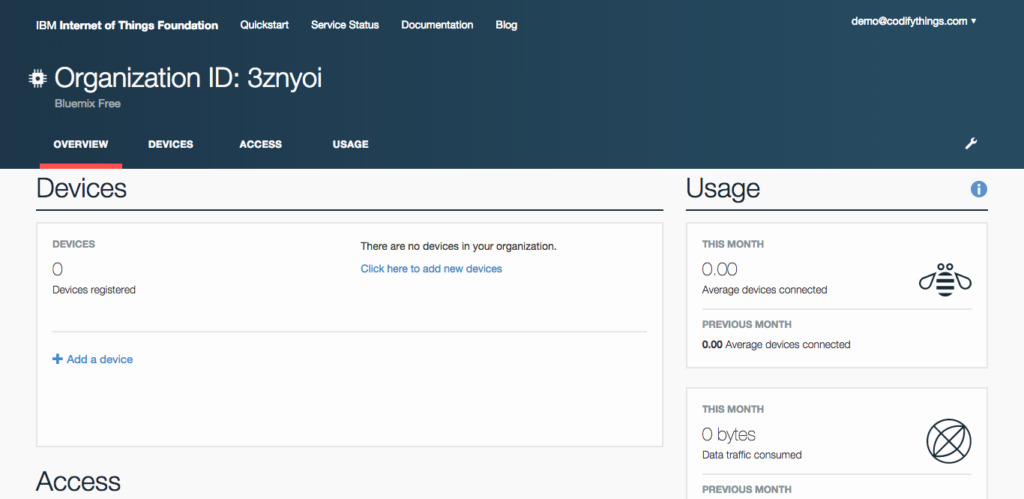
Overview tab provides you quick information about your Devices, Access, and Usage. Your device needs to be registered before it can start sending events to IoTF. Click on + Add a device link under Devices section.
If you have added devices previously then you can choose an existing Device Type otherwise you will need to create a new Device Type. Click on Create device type button.
Note: Device Type can be considered a template for devices i.e. all devices belonging to same Device Type will be initialized with same attributes.
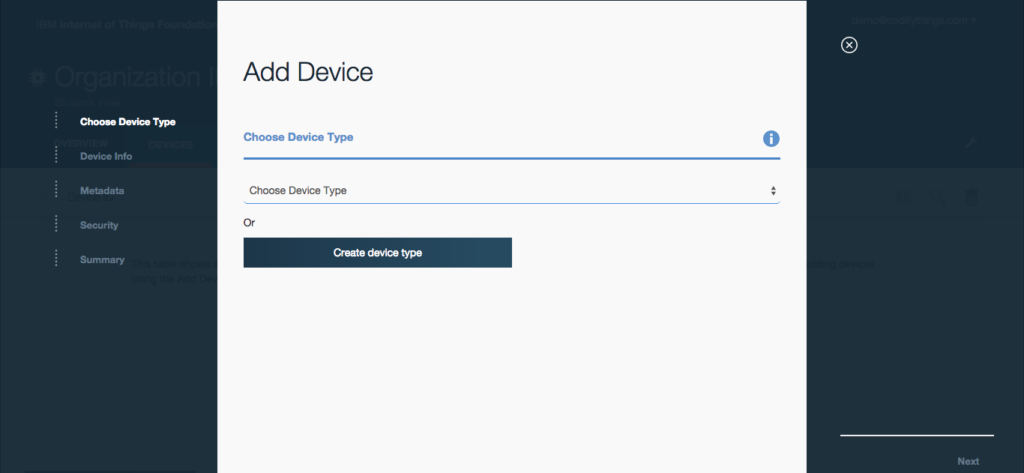
Select Create device type.
Enter Name and Description of the Device Type. Click Next to proceed.
Note: Later on in Arduino code, you will need to use this Name and depending on your version of MQTT client library that you are using to publish sensor data there might be a length limit, so check your client library for client name length limit.
Select Description from attributes list. Click on Next button.

Whichever Attribute you chose, on Submit Information screen you will need to provide values for them. Click Next.

Click Create button to complete Device Type setup.

You will be taken back to Add Device screen. Make sure you have selected the newly created Device Type from the list of values. Click Next.

On Device Info screen enter unique Device ID, and if you see Description is pre-filled with information that you entered while creating a new Device Type. Click Next.

Leave Metadata screen empty and click Next.

On Security screen, you have the option to either auto-generate a token or provide your own token. Leave Provide a token (optional) field empty and click Next button, this will make sure that a token is auto-generated.

Review your Device information on Summary screen and click Add button.

On next screen, the system will display auto-generated device token, make sure you copy and save the token as it will not be displayed again.

Your device setup is now complete and will be visible on the dashboard.

Arduino Code
IoTF is ready to receive events. Next, you are going to write Arduino code that will sense and publish events. Start your Arduino IDE and either type the code provided below or download it from GitHub. All the code goes into a single source file (*.ino) but in order to make it easy to understand and reuse, it has been divided into 5 sections.
- External Libraries: includes all libraries required to run the program
- - https://github.com/arduino/Arduino/tree/master/libraries/Ethernet
- - https://github.com/arduino/Arduino/tree/master/libraries/WiFi
- - http://playground.arduino.cc/main/DHT11Lib
- - https://github.com/knolleary/pubsubclient/releases/tag/v2.3
- Internet Connectivity Setup: code for WiFi connectivity, you simply need to replace
[code lang="js"]
char ssid[] = "<SSID_HERE>";
char pass[] = "<PASSWORD_HERE>";
[/code]
- Sensor Setup: code for reading sensor data
- Data Publish: code for publishing sensor data to IoTF, make sure to provide custom values in following fields
[code lang="js"]
char server[] = "<Organization_ID_HERE>.messaging.internetofthings.ibmcloud.com";
int port = 1883;
char topic[] = "iot-2/evt/<EVENT_NAME>/fmt/<EVENT_FORMAT>";
String clientName = String("d:<Organization_ID_HERE>:<Device_Type_HERE>:<Device_ID_HERE>");
char token[] = "<DEVICE_TOKEN>";
[/code]
- Standard Arduino Functions: implementation of standard Arduino functions setup() and loop()
[code lang="js"]
/***************************************************************************
* External Libraries
**************************************************************************/
#include <SPI.h>
#include <WiFi.h>
#include <dht11.h>
#include <PubSubClient.h>
/***************************************************************************
* Internet Connectivity Setup - Variables & Functions
**************************************************************************/
char ssid[] = "<SSID_HERE>"; // Network SSID (name)
char pass[] = "<PASSWORD_HERE>"; // Network Password (use for WPA,
// or use as key for WEP)
int keyIndex = 0; // Network Key Index Number
// (needed only for WEP)
int status = WL_IDLE_STATUS;
WiFiClient client;
void connectToInternet()
{
status = WiFi.status();
// Check for the presence of the shield
if (status == WL_NO_SHIELD)
{
Serial.println("[ERROR] WiFi Shield Not Present");
// Do nothing
while (true);
}
// Attempt to connect to WPA/WPA2 Wifi network
while ( status != WL_CONNECTED)
{
Serial.print("[INFO] Attempting Connection - WPA SSID: ");
Serial.println(ssid);
status = WiFi.begin(ssid, pass);
}
// Connection successful
Serial.print("[INFO] Connection Successful");
Serial.print("");
printConnectionInformation();
Serial.println("-----------------------------------------------");
Serial.println("");
}
void printConnectionInformation()
{
// Print Network SSID
Serial.print("[INFO] SSID: ");
Serial.println(WiFi.SSID());
// Print Router's MAC address
byte bssid[6];
WiFi.BSSID(bssid);
Serial.print("[INFO] BSSID: ");
Serial.print(bssid[5], HEX);
Serial.print(":");
Serial.print(bssid[4], HEX);
Serial.print(":");
Serial.print(bssid[3], HEX);
Serial.print(":");
Serial.print(bssid[2], HEX);
Serial.print(":");
Serial.print(bssid[1], HEX);
Serial.print(":");
Serial.println(bssid[0], HEX);
// Print received signal strength
long rssi = WiFi.RSSI();
Serial.print("[INFO] Signal Strength (RSSI): ");
Serial.println(rssi);
// Print encryption type
byte encryption = WiFi.encryptionType();
Serial.print("[INFO] Encryption Type: ");
Serial.println(encryption, HEX);
// Print WiFi Shield's IP address
IPAddress ip = WiFi.localIP();
Serial.print("[INFO] IP Address: ");
Serial.println(ip);
// Print MAC address
byte mac[6];
WiFi.macAddress(mac);
Serial.print("[INFO] MAC Address: ");
Serial.print(mac[5], HEX);
Serial.print(":");
Serial.print(mac[4], HEX);
Serial.print(":");
Serial.print(mac[3], HEX);
Serial.print(":");
Serial.print(mac[2], HEX);
Serial.print(":");
Serial.print(mac[1], HEX);
Serial.print(":");
Serial.println(mac[0], HEX);
}
/*****************************************************************************
* Sensor Setup - Variables & Functions
****************************************************************************/
dht11 DHT11;
#define DHT11PIN 3
float humidity = 0.0;
float tempC = 0.0;
void readSensorData()
{
int chk = DHT11.read(DHT11PIN);
Serial.print("[INFO] DHT11 Read: ");
switch (chk)
{
case DHTLIB_OK:
Serial.println("OK");
humidity = (float)DHT11.humidity;
tempC = (float)DHT11.temperature;
Serial.print("[INFO] Humidity (%): ");
Serial.print(humidity, 2);
Serial.print(" Temperature (*C): ");
Serial.println(tempC, 2);
break;
case DHTLIB_ERROR_CHECKSUM:
Serial.println("Checksum Error");
break;
case DHTLIB_ERROR_TIMEOUT:
Serial.println("Time Out Error");
break;
default:
Serial.println("Unknown Error");
break;
}
}
/***************************************************************************
* Data Publish - Variables & Functions
**************************************************************************/
// IP address of the IBM MQTT server
char server[] = "<Organization_ID_HERE>.messaging.internetofthings.ibmcloud.com";
int port = 1883;
char topic[] = "iot-2/evt/<EVENT_NAME>/fmt/<EVENT_FORMAT>";
String clientName = String("d:<Organization_ID_HERE>:<Device_Type_HERE>:<Device_ID_HERE>");
char token[] = "<DEVICE_TOKEN>";
PubSubClient pubSubClient(server, port, 0, client);
void publishData()
{
// Connect MQTT Broker
Serial.println("[INFO] Connecting to MQTT Broker");
char clientStr[60];
clientName.toCharArray(clientStr,60);
if (pubSubClient.connect(clientStr, "use-token-auth", token))
{
Serial.println("[INFO] Connection to MQTT Broker Successfull");
}
else
{
Serial.println("[INFO] Connection to MQTT Broker Failed");
}
// Publish to MQTT Topic
if (pubSubClient.connected())
{
//Read sensor data
readSensorData();
Serial.println("[INFO] Publishing to IBM IoTF");
String data = "{"d": {"humidity": "" + String(humidity) + "", "tempC": "" + String(tempC) + ""}}";
char jsonStr[50];
data.toCharArray(jsonStr,50);
Serial.print("[INFO] JSON Data: ");
Serial.println(jsonStr);
char topicStr[33];
String topicName = topic;
topicName.toCharArray(topicStr,33);
if (pubSubClient.publish(topicStr,jsonStr))
{
Serial.println("[INFO] Data Published Successfully");
}
else
{
Serial.println("[INFO] Failed to Publish Data");
}
Serial.println("[INFO] Disconnecting Server");
pubSubClient.disconnect();
}
Serial.println("[INFO] Publish to MQTT Broker Complete");
Serial.println("-----------------------------------------------");
pubSubClient.loop();
}
/***************************************************************************
* Standard Arduino Functions - setup(), loop()
**************************************************************************/
void setup()
{
// Initialize serial port
Serial.begin(9600);
// Connect Arduino to internet
connectToInternet();
}
void loop()
{
//readSensorData();
publishData();
delay(5000);
}
[/code]
Final Product
Make sure your Arduino is powered on and IoTF publish code has been deployed. As soon as the code has been deployed, open serial monitor.
Log in to IBM IoTF dashboard and open your device, the Recent Events section will list all the events with their JSON message.

Click on any Event to see payload.

Sensor Information section shows the latest value of each data point.
The Connection Log section will provide you information about the status of connection attempts from your device.


How To Improve Business Processes Using Internet Of Things (IoT)
Note: This article was originally published on my previous blog ProcessRamblings.com.
In this article, we are going to look at how different industries are leveraging (or can leverage) internet of things (IoT) to improve their business processes. These improvements can increase efficiency, improve data accuracy and resource utilization and most importantly increase customer satisfaction.
Auto Insurance - Additional Discount Process
 Recently all major auto insurance companies have started offering their customers additional discounts based on their driving performance. The customers are required to install a tracking device for a specified amount of time, once installed the tracking device starts transmitting data to the insurance company. The insurance company captures and evaluates the data until the trial period ends.
Here is an overview of the additional auto insurance discount business process. This does not include all the steps, only main activities have been included to keep it simple.
- Customer applies for the trial
- Insurance company mails the device
- Customer installs the device
- Device transmit analytics
- Insurance company captures analytics
- Insurance company evaluate captured data
- At the end of trial period, the insurance company applies additional discount (percentage is based on customer’s driving performance)

By leveraging IoT data both the auto insurance companies and customers are reaping multiple benefits such as:
- Insurance companies get more accurate driving data of customers for future analytics.
- Insurance companies utilize the captured data to provide an appropriate percentage of additional discounts to good performing customers, which further increases customer loyalty.
- Rather than waiting for the trial period to end, customers get access to their driving performance and expected discounts information live.
- To get higher discounts, customers can use the violations data (such as rapid acceleration and rapid braking) to improve their driving habits as well.
Waste Management - Garbage Collection Process
 Recently cities like Barcelona have moved from the traditional process where a garbage truck would have to make a scheduled route and pick up garbage cans regardless of them being full or empty.
Here is an overview of the new garbage collection business process. This does not include all the steps, only main activities have been included to keep it simple.
- Set Threshold (garbage cans have embedded systems to communicate)
- Garbage Can Transmits Analytics
- Receive Analytics
- Evaluate Data (check if the threshold has exceeded or not?)
- Calculate Smarter Route & Schedule Garbage Pickup

By leveraging IoT data the waste management companies are reaping (can reap) multiple benefits such as:
This process resulted in poor utilization of the garbage trucks, higher fuel costs and of course causing air and noise pollution.
- Improved resource utilization – Using IoT, companies would know which garbage cans have exceeded the thresholds and need to be picked up. This data could be used to calculate smarter routes resulting in a reduced number of routes as compared to sending garbage trucks to all pre-defined routes.
- Lower costs – Smarter routes will also help in lower fuel and maintenance costs of the garbage trucks.
- Lower pollution – Another great advantage would be the reduction in air and noise pollution.
Those were just a few examples of how the internet of things (IoT) is being used to improve business processes. There are numerous other processes that can benefit from the internet of things (IoT). In conclusion, organizations should start thinking about IoT and how it can exponentially improve their efficiency and customer’s experience.
Republished/Cited
- Article republished on BPMLeader.com