
IoT Prototyping Mobile App - MQTT Viewer
MQTT Viewer is a simple, configurable & ready to use internet of things (IoT) client. This app has been designed to help you get started with your IoT journey. Simply configure your MQTT server details, and start receiving events in the app immediately. Great for prototyping!

Features
- Simple & clean user interface
- Connects to different MQTT servers
- Supports username and password authentication
- Accepts both plain and JSON format messages
- Creates notifications when new messages arrive
- Allows to customize color theme
- Allows to choose any icon from Font Awesome and Weather Icons libraries
- Provides line chart and bar chart for data visualization


Settings
From the toolbar on the top right, select Settings.
General
This section contains following settings.
- App Name: Tap on the setting to edit. Enter app name that will be shown on top of the main screen and as the title for any notifications.
- Background Color: Tap on the setting to edit. Enter a color in hex format i.e. #FFFFFF. This setting will change the background color of the main screen.
- Foreground Color: Tap on the setting to edit. Enter a color in hex format i.e. #FFFFFF. This setting will change text color on the main screen.
- Highlighter Color: Tap on the setting to edit. Enter a color in hex format i.e. #FFFFFF. This setting will change the color for charts displayed on the main screen.
Server
This section contains following settings.
- Host: Tap on the setting to edit. Enter the hostname of MQTT server that you are connecting e.g. iot.eclipse.org.
- Port: Tap on the setting to edit. Enter the port number of MQTT server that you are connecting e.g. 1883.
- Username: Tap on the setting to edit. If MQTT server requires authentication, then enter provided username.
- Password: Tap on the setting to edit. If MQTT server requires authentication, then enter provided password.
- Topic: Tap on the setting to edit. Enter the topic name that the app will subscribe.
- Device: Tap on the setting to edit. Enter a device name, in some cases, MQTT servers require device name to be in a specific format, otherwise, this information shows up in MQTT logs when a client connects.
- QoS: Tap on the setting to edit. Select 0 or 1 for the quality of service.
Message
This section contains following settings.
- Enable JSON Format: App supports both plain and JSON formats. Tap on the setting to enable/disable.
- Data Key: Tap on the setting to edit. If JSON Format is enabled, then enter key of the field in JSON that contains sensor data e.g. {key: temperature value: 25}, enter the value in this field, and the app will automatically extract that information.
Notifications
This section contains following settings.
- Enable: App generates notifications when a new message arrives from MQTT server both plain and JSON formats. Tap on the setting to enable/disable.
Widgets
This section contains following settings.
- Show Icon: Tap on the setting to enable/disable if an icon should be shown on the main screen.
- Icon Library: If enabled, tap on the setting to edit. App currently supports Font Awesome and Weather Icons libraries. Select an icon library.
- Icon Type: If enabled, tap on the setting to edit. Enter font code available from respective library site (links provided below). Only enter the 4 digit code e.g. f00d, do not enter &#x before and ; after the code.
- Show Chart: Tap on the setting to enable/disable if a chart should be shown o the main screen.
- Chart Type: If enabled, tap on the setting to edit. Select chart type, currently only Line chart and Bar chart available. Only numeric messages are displayed on the chart, non-numeric messages are skipped from historical chart.
Disclaimer: This mobile app has only been designed for prototyping purposes, and is not production ready.
Getting Started with Carriots® IoT
This article teaches you how to develop an Internet of Things (IoT) application using Carriots® and Arduino Yún. Carriots® is an Internet of Things (IoT) platform (the name is an acronym for CARRying the Internet Of ThingS).
In this tutorial, you are going to develop a simple Weather Monitoring IoT application. This IoT application will sense temperature and humidity data and publish it to Carriots using the HTTP protocol.
Learning Objectives
At the end of this tutorial you will be able to:
- Design an IoT device that senses temperature and humidity
- Create required hierarchy in Carriots
- Write code to publish device data (stream) to Carriots
- Generate an interactive graph from device data in Carriots
Hardware
Note: If the model of Arduino that you are using comes with built-in WiFi capabilities then you do not need a separate WiFi Shield.
- Arduino Uno
- Arduino WiFi Shield
- DHT11 (Humidity + Temperature Sensor)
- Jumper Cables

Software
Circuit
Step 1: Make sure your Arduino is not connected to a power source.
Note: If the model of Arduino that you are using comes with built-in WiFi capabilities then you do not need a separate WiFi Shield and can skip this step.
Step 2: Attach WiFi Shield or Ethernet Shield on top of Arduino.
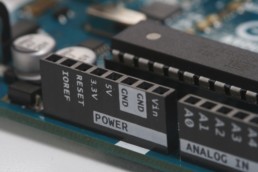
Step 3: Using jumper cables connect power (VNC) and ground (GND) ports on Arduino to power (+) and ground (-) ports on the breadboard.
Tip: It is a good practice to use red jumper cable for power (+ / VNC) and black jumper cable for ground (- / GND).
Step 4: Now that your breadboard has a power source, using jumper cables connect power (+) and ground (-) ports of your breadboard to power and ground ports of the DHT11 sensor.
Step 5: To read temperature and humidity values, you will need to connect a jumper cable from signal port of DHT11 sensor to D3 (Digital) port of your Arduino.
Your circuit is now complete and it should look similar to figures below.

Carriots' Setup
Before you can begin developing IoT apps using Carriots, you need to understand the hierarchy that has to be followed. The figure below provides an overview of the hierarchy.

- Projects: A project is the top of Carriots' hierarchy and helps you to manage your IoT projects by grouping services and devices into separate projects. In this tutorial, you will define Weather Monitoring as a top-level project.
- Services: Services are device or assets with common behavior e.g. Temperature and Humidity are two services under Weather Monitoring project.
- Groups: Groups helps in managing IoT projects by grouping devices. For example, as shown in the figure above Home and Office provide a logical grouping of all devices under the Temperature service.
- Devices: Devices are at the core of IoT projects. They are the virtual representation of "Things" in "IoT". When you send data (a.k.a streams) to Carriots they are always related to a device.
Now that you have a basic understanding of the platform, you can proceed with defining the required hierarchy of your IoT application.
Signup for Carriots.
Login to Carriots, you will be redirected to the Dashboard.

Create Project
Click on Projects from Hierarchy menu, this will take you to the screen with a list of all projects.

Click on + New Project. Enter Name and Description as provided in the screenshot below.

Click on Create Project. The newly created project will start showing up in Project List.

Create Service
Click on Services from Hierarchy menu, this will take you to the screen with a list of all service.

Click on + New Service. Enter Name and Description as provided in the screenshot below. Select WeatherMonitoring from Project drop-down.

Click on Create Service. The newly created service will start showing up in Service List.

Create Group
Click on Groups from Hierarchy menu, this will take you to the screen with a list of all service.

Click on + New Group. Enter Name and Description as provided in the screenshot below. Select Temperature from Service drop-down.

Click on Create Group. The newly created service will start showing up in Group List.

Create Device
Click on Devices from Hierarchy menu, this will take you to the screen with a list of all devices.

Click on + New Device. Enter Name, Description, Type, Sensor, Time zone and Group as provided in the screenshot below.

Click on Create Device. The newly created device will start showing up in Device List.

API Key
Next, you need to locate or generate API Keys for your account. API Keys allow your devices to securely communicate with Carriots platform.

Apikeys can be found under the Settings menu. Clicking on Apikeys will take you to the screen with a list of all Apikeys. In the next section, you will be using this Automatic Apikey Full for authentication and communication.

Code (Arduino Yún)
Next, you are going to write code for Arduino Yún to read temperature sensor data and publishing it to a Carriots stream.
Start your Arduino IDE and either type or copy the code provided below. All the code goes into a single source file (*.ino) but in order to make it easy to understand and reuse it has been divided into 5 sections.
- External Libraries
- Internet Connectivity (WiFi)
- Read Sensor Data
- Carriots (Publish) - you will need to get your Apikey and Device ID from Carriots dashboard
- Standard Functions
[code lang="js"]
/***************************************************************************
* External Libraries
**************************************************************************/
#include <Process.h>
#include <YunClient.h>
#include <dht11.h>
/***************************************************************************
* Internet Connectivity Setup - Variables & Functions
**************************************************************************/
// Yun client already connected to the internet
YunClient client;
void printConnectionInformation()
{
// Initialize a new process
Process wifiCheck;
// Run Command
wifiCheck.runShellCommand("/usr/bin/pretty-wifi-info.lua");
// Print Connection Information
while (wifiCheck.available() > 0)
{
char c = wifiCheck.read();
Serial.print(c);
}
Serial.println("-----------------------------------------------");
Serial.println("");
}
/*****************************************************************************
* Sensor Setup - Variables & Functions
****************************************************************************/
dht11 DHT11;
#define DHT11PIN 3
float tempC = 0.0;
void readSensorData()
{
int chk = DHT11.read(DHT11PIN);
Serial.print("[INFO] DHT11 Read: ");
switch (chk)
{
case DHTLIB_OK:
Serial.println("OK");
tempC = (float)DHT11.temperature;
Serial.print(" Temperature (*C): ");
Serial.println(tempC, 2);
break;
case DHTLIB_ERROR_CHECKSUM:
Serial.println("Checksum Error");
break;
case DHTLIB_ERROR_TIMEOUT:
Serial.println("Time Out Error");
break;
default:
Serial.println("Unknown Error");
break;
}
}
/***************************************************************************
* Data Publish - Variables & Functions
**************************************************************************/
#define APIKEY "TO BE REPLACED with your Carriots APIKEY"
#define DEVICE "TO BE REPLACED with your Device's ID developer"
// Set up net client info
const unsigned long postingInterval = 10000; //delay between updates to Carriots
unsigned long lastRequest = 0; // when you last made a request
String dataString = "";
void transmitSensorData()
{
// Form the string for the APIKEY header parameter
String apiString = "carriots.apikey: ";
apiString += APIKEY;
// Convert the readings to a String to send it
dataString = "{"protocol":"v1","checksum":"","device":"";
dataString += DEVICE;
dataString += "","at":"now","data":{"temperature":";
dataString += tempC;
dataString += "}}";
Serial.println("[INFO] Data String:" + dataString);
// Send the HTTP POST request
Serial.println("[INFO] HTTP GET Started");
Process carriots;
carriots.begin("curl");
carriots.addParameter("-k");
carriots.addParameter("--request");
carriots.addParameter("POST");
carriots.addParameter("--data");
carriots.addParameter(dataString);
carriots.addParameter("--header");
carriots.addParameter(apiString);
carriots.addParameter("https://api.carriots.com/streams/");
carriots.run();
Serial.println("[INFO] HTTP GET Completed");
// If there's incoming data from the net connection, print it on Serial
while (carriots.available() > 0)
{
char c = carriots.read();
Serial.write(c);
}
}
/***************************************************************************
* Standard Arduino Functions - setup(), loop()
**************************************************************************/
void setup()
{
// Initialize serial port
Serial.begin(9600);
// Do nothing until serial monitor is opened
while (!Serial);
// Contact the Linux processor
Bridge.begin();
// Print connection information
printConnectionInformation();
lastRequest = millis();
}
void loop()
{
// Get a timestamp to calculate reading and sending intervals
long now = millis();
// If the sending interval has passed since last connection,
// then connect again and send data
if (now - lastRequest >= postingInterval)
{
// Read sensor data
readSensorData();
// Transmit sensor data
transmitSensorData();
lastRequest = now;
}
// Delay
delay(1000);
}
[/code]
Final Product
Make sure your Arduino is powered on and Carriots publish code has been deployed. As soon as the code has been deployed, open serial monitor. As shown in the figure below Arduino will start displaying data being published to Carriots IoT.

Once few readings have been published to the platform, go back to Carriots dashboard, and from the menu click on Data > Data Streams.

This will take you to Data Streams List and all the readings published by Arduino so far will show up here.

Carriots provides a very simple way to generate graphs using the sensor data. From the menu, click on Data > Graphs Widget this will open Graphs Wizard. Select your Device, and click on Next Step.

On Step 2 of the wizard select data that you want to display (in this case it will be temperature). Click on Next Step.

On Step 3 of the wizard select graph type that you want to display. Click on Next Step.

One Step 4, the wizard will show a summary, with a code snippet that you can use in your web apps to display data directly from Carriots.

Step 4 of the wizard will also show how the graph will look like.

Next Steps
You can try changing code to publish data for other IoT sensors as well. You can find the code for reading data for various other sensors here. Share with us the application that you built!
Getting started with Xively®: Data Publish
This post provides an overview and learning objectives of Chapter 12 from my book Building Arduino Projects for the Internet of Things.
Introduction
IoT platforms provide developers with the ability to develop, deploy and manage their IoT applications from one central location in a secure manner. IoT platforms expedite the development process by providing required tools in a cloud-based environment, which means developers do not spend time on setups. A good IoT platform would ideally include most of the tools that we have covered in previous 11 chapters such as MQTT broker, HTTP server, REST API support, database to store sensor data, Node-RED for complex orchestrations, device location, secure communications, reporting, analytics and easy to use tools for building the web and mobile apps etc.
In this chapter, you are going to cover a popular IoT platform Xively. You are going to build a Soil Moisture Control system that sends out an email alert whenever the moisture level of soil falls below a certain threshold. The figure below shows a high-level diagram of all components involved in this system. The first component is an Arduino device that monitors soil moisture level and publishes a message to Xively. Second and third components reside on Xively platform. With some basic configurations, the platform will be able to receive, store and display data sent by the sensor.

Learning Objectives
At the end of this chapter you will be able to:
- Read soil moisture sensor data
- Setup Xively to receive sensor data
- Setup trigger in Xively to send an email using a Zapier task
- Write code to read sensor data and publish it to Xively
Final Product

IoT Patterns: Machine to Machine - Energy Conservation System
This post provides an overview and learning objectives of Chapter 11 from my book Building Arduino Projects for the Internet of Things.
Introduction
As IoT technology evolves, and machines become smarter and capable, the need for human intervention will reduce. Machines will be able to autonomously respond to alerts generated by other machines.
In this chapter, you are going to build an Energy Conservation System that will show how two machines can communicate. The figure below shows a high-level diagram of all components involved in this system. The first component is an Arduino device that monitors light brightness levels and sends an alert whenever the levels are low. The second component is an MQTT broker that helps avoid point-to-point communication. Multiple devices can communicate with each other without knowing each other's identities. The final component is another Arduino device that controls lights, if light sensor publishes a message to MQTT broker that light brightness level is low then this device will automatically turn the lights on. In real life, you can see this system being utilized to turn street lights on or off only when they are required instead of doing that at scheduled times.

Learning Objectives
At the end of this chapter you will be able to:
- Read data from a light sensor
- Publish message to MQTT broker
- Control LED lights
- Subscribe Arduino to an MQTT broker
IoT Patterns: Machine to Human - Waste Management System
This post provides an overview and learning objectives of Chapter 10 from my book Building Arduino Projects for the Internet of Things.
Introduction
Due to regulatory requirements or lack of technology, there will be scenarios where human intervention is required to respond to sensor generated alerts.
In this chapter, you are going to build a simple Waste Management System to elaborate this use case. The figure below shows a high-level diagram of all components involved in this system. The first component is an Arduino device that monitors garbage level with proximity sensor and publishes a message to an MQTT broker. The second component is a Node-RED flow that subscribes to an MQTT broker. The final component is a workflow that gets initiated whenever garbage levels are high and a pickup needs to be scheduled.

Learning Objectives
At the end of this chapter you will be able to:
- Read data from a proximity sensor
- Publish message to MQTT broker
- Build a workflow in Effektif (now Signavio Workflow)
- Create a Node-RED flow and initiate it from Arduino
Final Product

IoT Patterns: Location Aware - Livestock Tracking System
This post provides an overview and learning objectives of Chapter 9 from my book Building Arduino Projects for the Internet of Things.
Introduction
Location aware devices are going to be one of the largest contributors of savings from IoT implementation. The usages of this IoT pattern will be seen in various different types of scenarios e.g. optimal route planning, endangered wildlife tracking and pin pointing crash locations etc.
In this chapter, you are going to build a Livestock Tracking System. The figure below shows a high-level diagram of all components involved in this system. The first component is an Arduino device that captures current coordinates and publishes it to a server using HTTP request. The second component is a server that receives GPS coordinates and stores them in a database. The final component is a web page that shows stored GPS coordinates on a map. This web page is physically going to reside on the server as well.

Learning Objectives
At the end of this chapter you will be able to:
- Read GPS coordinates
- Publish GPS coordinates to a server
- Display GPS coordinates in a map
Final Product

IoT Patterns: Web Apps - Temperature Monitoring System
This post provides an overview and learning objectives of Chapter 8 from my book Building Arduino Projects for the Internet of Things.
Introduction
As most of our day to day tasks and interactions move to mobile devices, web applications will still have a place. In IoT space, they will mainly be used for monitoring and control large scale implementations.
In this chapter, you are going to build a Temperature Monitoring System. The figure below shows a high-level diagram of all components involved in this system. The first component is an Arduino device that gathers temperature data and publishes it to a server using HTTP request. The second component is a server that receives temperature data and stores it in a database. Final component accesses temperature data from the server and presents it to users in a web-based analytics dashboard. This web-based analytics dashboard is physically going to reside on the server as well.

Learning Objectives
At the end of this chapter you will be able to:
- Read data from a temperature sensor
- Publish sensor data to a server
- Display sensor data in a web-based dashboard
Final Product

IoT Patterns: On Demand Clients - Smarter Parking System
This post provides an overview and learning objectives of Chapter 7 from my book Building Arduino Projects for the Internet of Things.
Introduction
Compared to real-time IoT pattern that provides end users data instantaneously, on demand pattern provides end users data only when requested. IoT applications built using this pattern get information by either directly accessing the device or getting it from a pre-stored location. On demand, the pattern is useful when your application is not actively looking for data, instead only accesses it when needed.
In this chapter, you are going to build an example of this pattern, a Smarter Parking System. The figure below shows a high-level diagram of all components involved in building this system. The first component is an Arduino device that monitors the status of parking spots with proximity sensor and publishes it to a server using HTTP request. The second component is a server with services to store parking spots data and an interface service that provides the number of open parking spots. The final component is an iOS app that accesses open parking spots data and displays it to users when requested.

Learning Objectives
At the end of this chapter you will be able to:
- Read data from a proximity sensor
- Send sensor data to a server using HTTP
- Display sensor data in an iOS app using HTTP
Final Product


IoT Patterns: Remote Control - Lighting Control System
This post provides an overview and learning objectives of Chapter 6 from my book Building Arduino Projects for the Internet of Things.
Introduction
The remote control is currently one of the most popular IoT patterns. Examples of this pattern can be found in IoT applications that let you remotely control things such as lights, thermostat and garage door using handheld devices or computers. It has mainly been used for home automation applications so far.
In this chapter, you are going to build a Lighting Control System. The figure below shows components of a Lighting Control System. The first component is an Android app that lets users control lights. It publishes messages to MQTT broker whenever the user taps on the app screen. The second component is an MQTT broker, and the final component of this IoT application is an Arduino device that turns lights on or off based on messages received from MQTT broker.

Learning Objectives
At the end of this chapter you will be able to:
- Write code to turn LEDs connected to Arduino on or off
- Subscribe Arduino to an MQTT broker
- Build an Android app that publishes to MQTT broker
Final Product

IoT Patterns: Realtime Clients - Intrusion Detection System
This post provides an overview and learning objectives of Chapter 5 from my book Building Arduino Projects for the Internet of Things.
Introduction
An important pattern of IoT is the ability to sense data and make it available to users in real-time, such as with home monitoring solutions, perimeter security applications, and inventory alerts.
In this chapter, you are going to build an example of this pattern, an intrusion detection system. The figure below shows components of an intrusion detection system. The first component is an Arduino device that has a motion sensor attached to it. The second component is an MQTT broker. You will use the publish-subscribe model of MQTT for sending intrusion detection notifications in real-time (for details, see Chapter 3). The final component of your IoT application is an Android app that subscribes to the MQTT broker and shows an alert notification to users whenever Arduino detects an intrusion and publishes a message to the MQTT broker.

Learning Objectives
At the end of this chapter you will be able to:
- Read motion sensor data from Arduino
- Publish sensor data to an MQTT broker
- Build an Android app that subscribes to an MQTT broker
- Display a notification in the app whenever a new message is published to the MQTT broker
Final Product


